– wifi ( as we build a server )
+ enable SSH
BURN with settings YES
try to boot the RPI with it
( i work headless so i just have to wait and see the new IP in network )
but even without, i use the Bitvise SSH client
it finds RPI4 ( login with my preset password )
sudo raspi-config
+ Interface options enable VNC
sudo apt update && sudo apt dist-upgrade
sudo reboot
i want fix IP:
sudo nmcli c show
sudo nmcli c mod 'Wired connection 1' ipv4.addresses 192.168.1.104/24 ipv4.method manual
sudo nmcli con mod 'Wired connection 1' ipv4.gateway 192.168.1.1
sudo nmcli con mod 'Wired connection 1' ipv4.dns "10.10.30.1 8.8.8.8 8.8.4.4"
check it:
sudo cat /etc/NetworkManager/system-connections/'Wired connection 1.nmconnection'
reboot
and check SSH (SFTP) and VNC in the new IP
Mosquitto
on RPI4 need a Mosquitto broker installed ( with user and password )
i follow https://raspberrytips.com/mqtt-broker-raspberry-pi/
sudo apt install mosquitto mosquitto-clients
sudo systemctl enable mosquitto
sudo mosquitto_passwd -c /etc/mosquitto/pwfile uPICOW
now that ask you for password twice:
pPICOW
pPICOW
sudo nano /etc/mosquitto/mosquitto.conf
and add at end:
listener 1883
allow_anonymous false
password_file /etc/mosquitto/pwfile
________________________________
and i can connect
send (publish) at boot a hello and a 1 min empty template report
and to show it, use like the local client from that RPI4 in terminal:
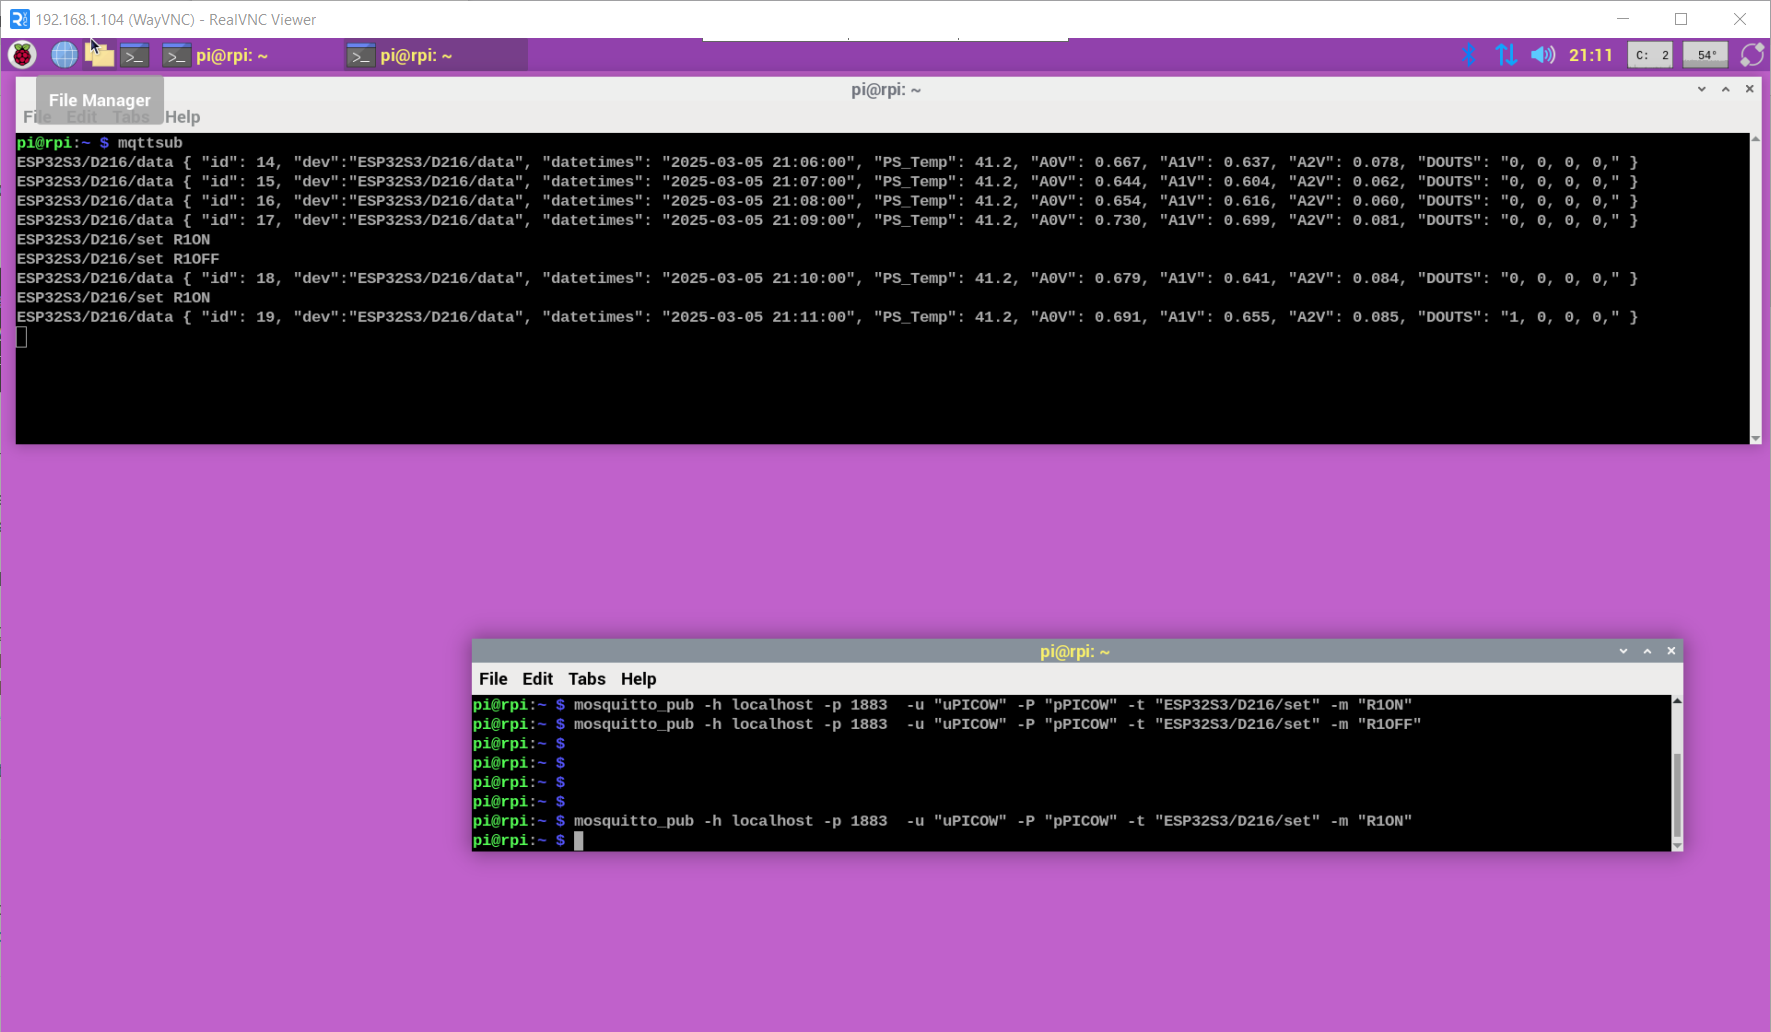
mosquitto_sub -h localhost -u "uPICOW" -P "pPICOW" -v -t "#"
and do also MQTT OPERATION ( like in a second terminal ):
mosquitto_pub -h localhost -u "uPICOW" -P "pPICOW" -t "PICOW/D215/set" -m "R1ON"
mosquitto_pub -h localhost -u "uPICOW" -P "pPICOW" -t "PICOW/D215/set" -m "R1OFF"
because i have on that PICO W a 4 RELAY board installed ( and i see RELAY 1 is working )
i use to put that into alias in .bash_aliases
instead client tools on linux terminal i recommend for win PC
https://mqtt-explorer.com/
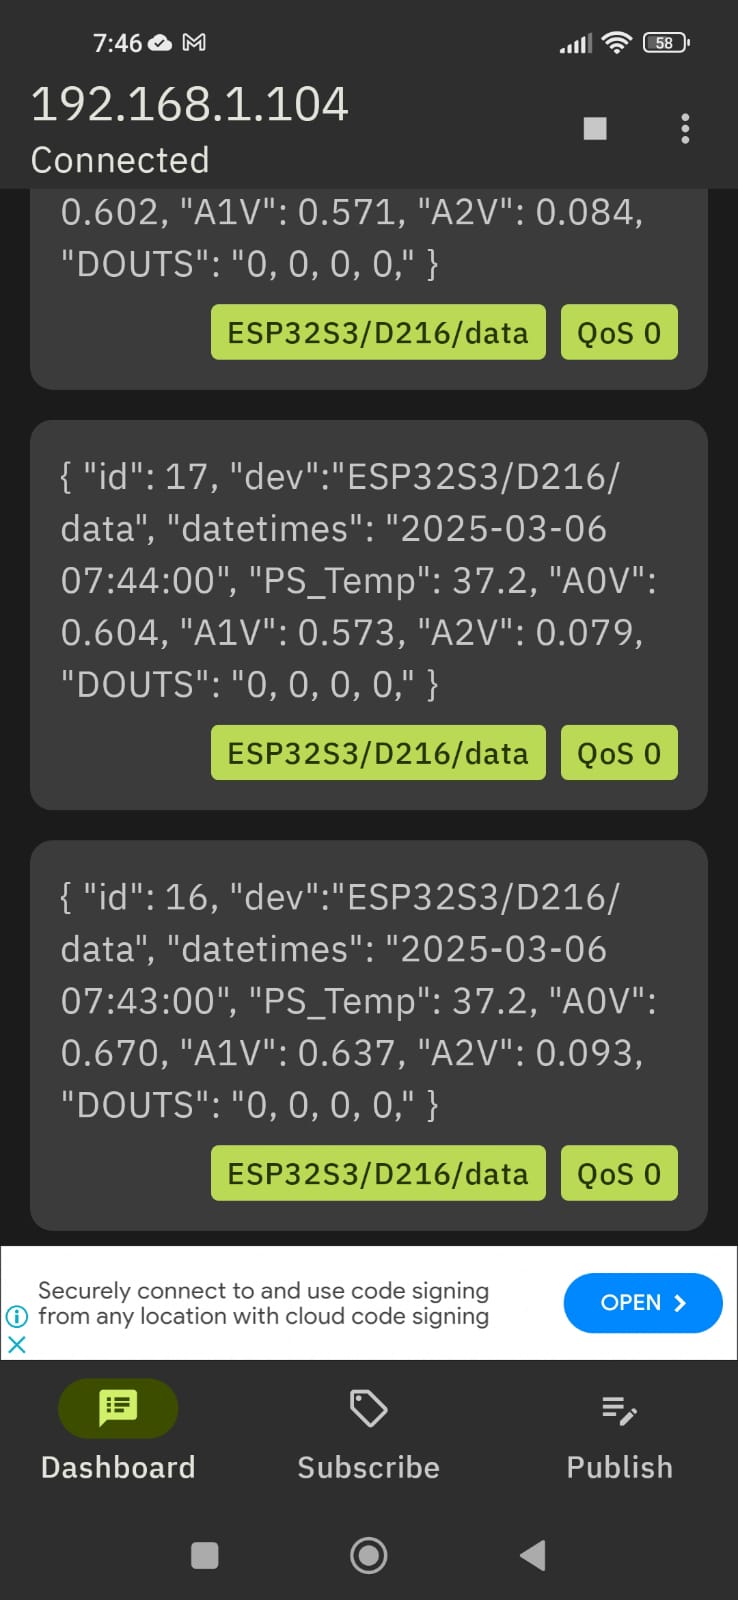
and for Android: MyMQTT
192.168.1.104
1883
MQTT V3
uPICOW
pPICOW
[connect]
Subsrcribe topic # [subscribe]
[dashboard]
Node-Red
bash <(curl -sL https://raw.githubusercontent.com/node-red/linux-installers/master/deb/update-nodejs-and-nodered)
yes
RPI tools YES
i select:
file YES
security NO
projects YES
manually commit changes
default
load modules YES
______________________________
reboot
node-red-start ( for test only )
but you want AUTO START NR:
sudo systemctl enable nodered.service
check browser:
http://192.168.1.104:1880/
on a fresh NR install
* dashboard and
* sqlite
need to be added like:
Menu - Manage palette option and search for node-red-dashboard
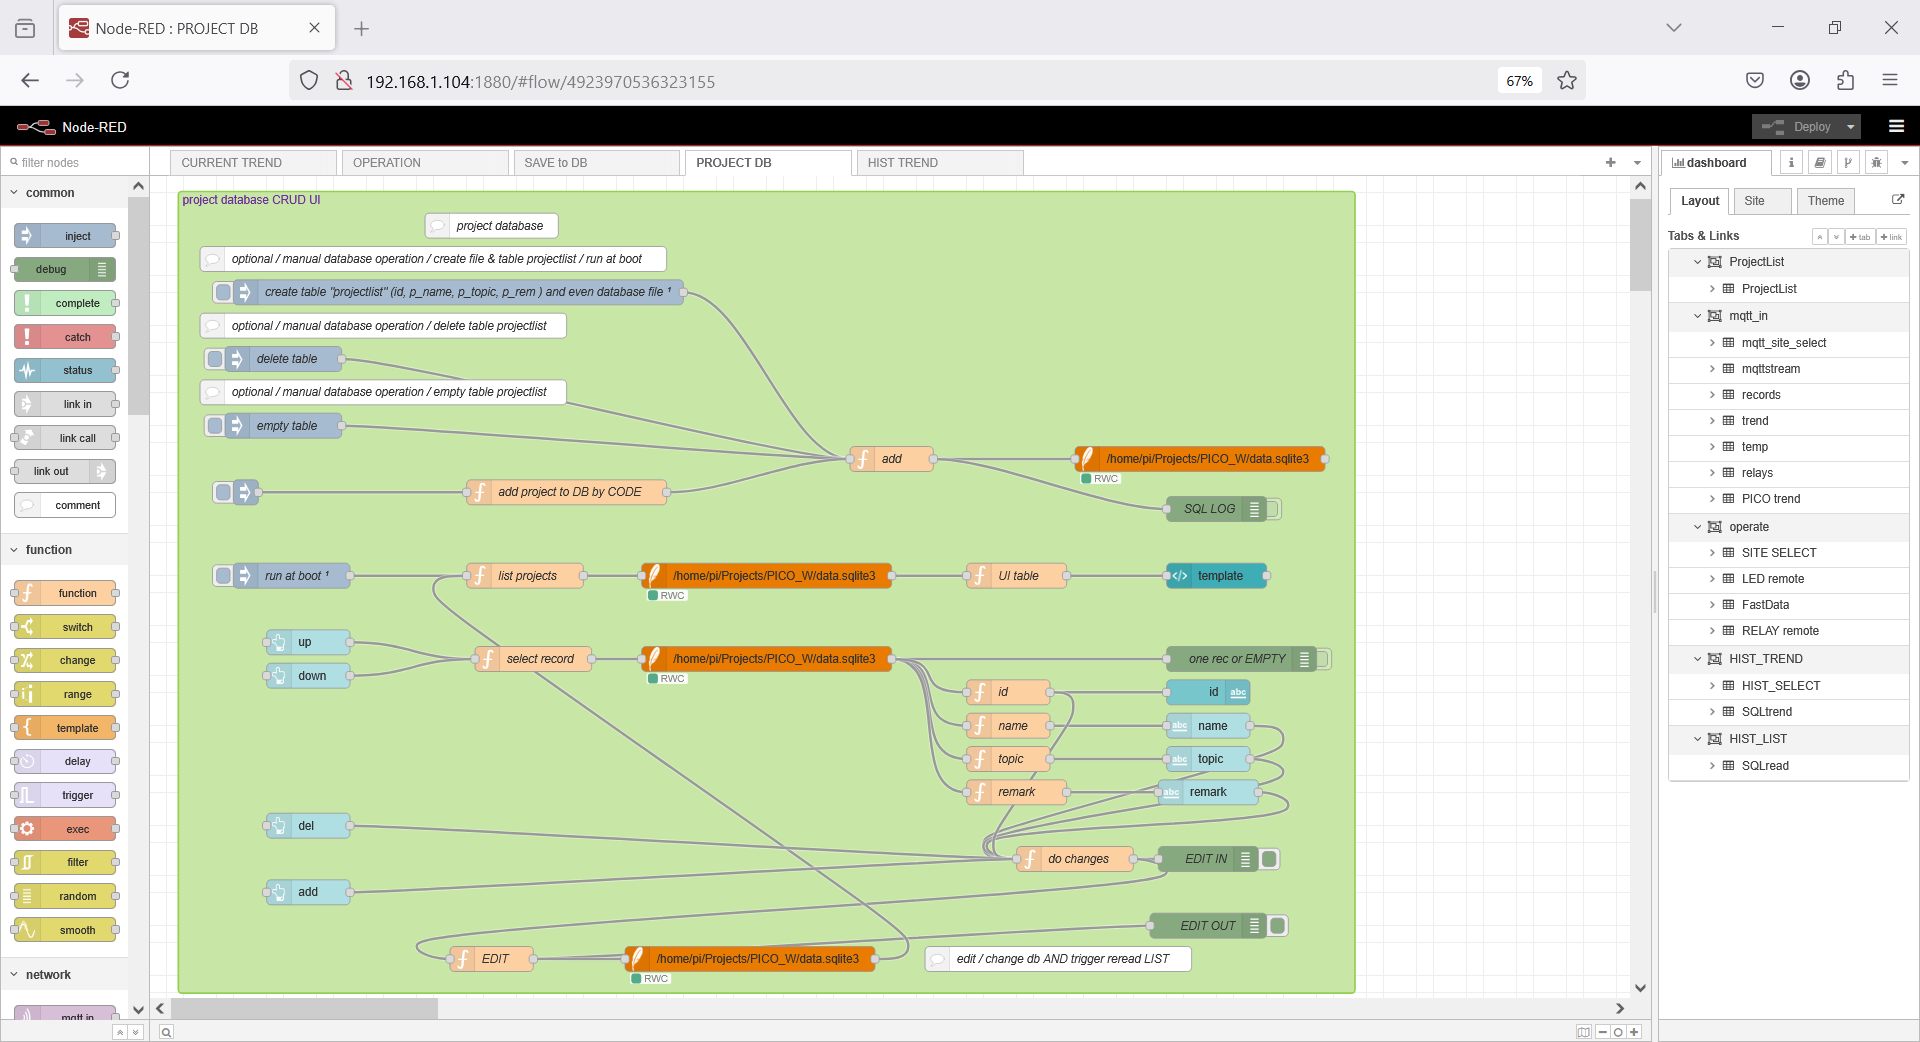
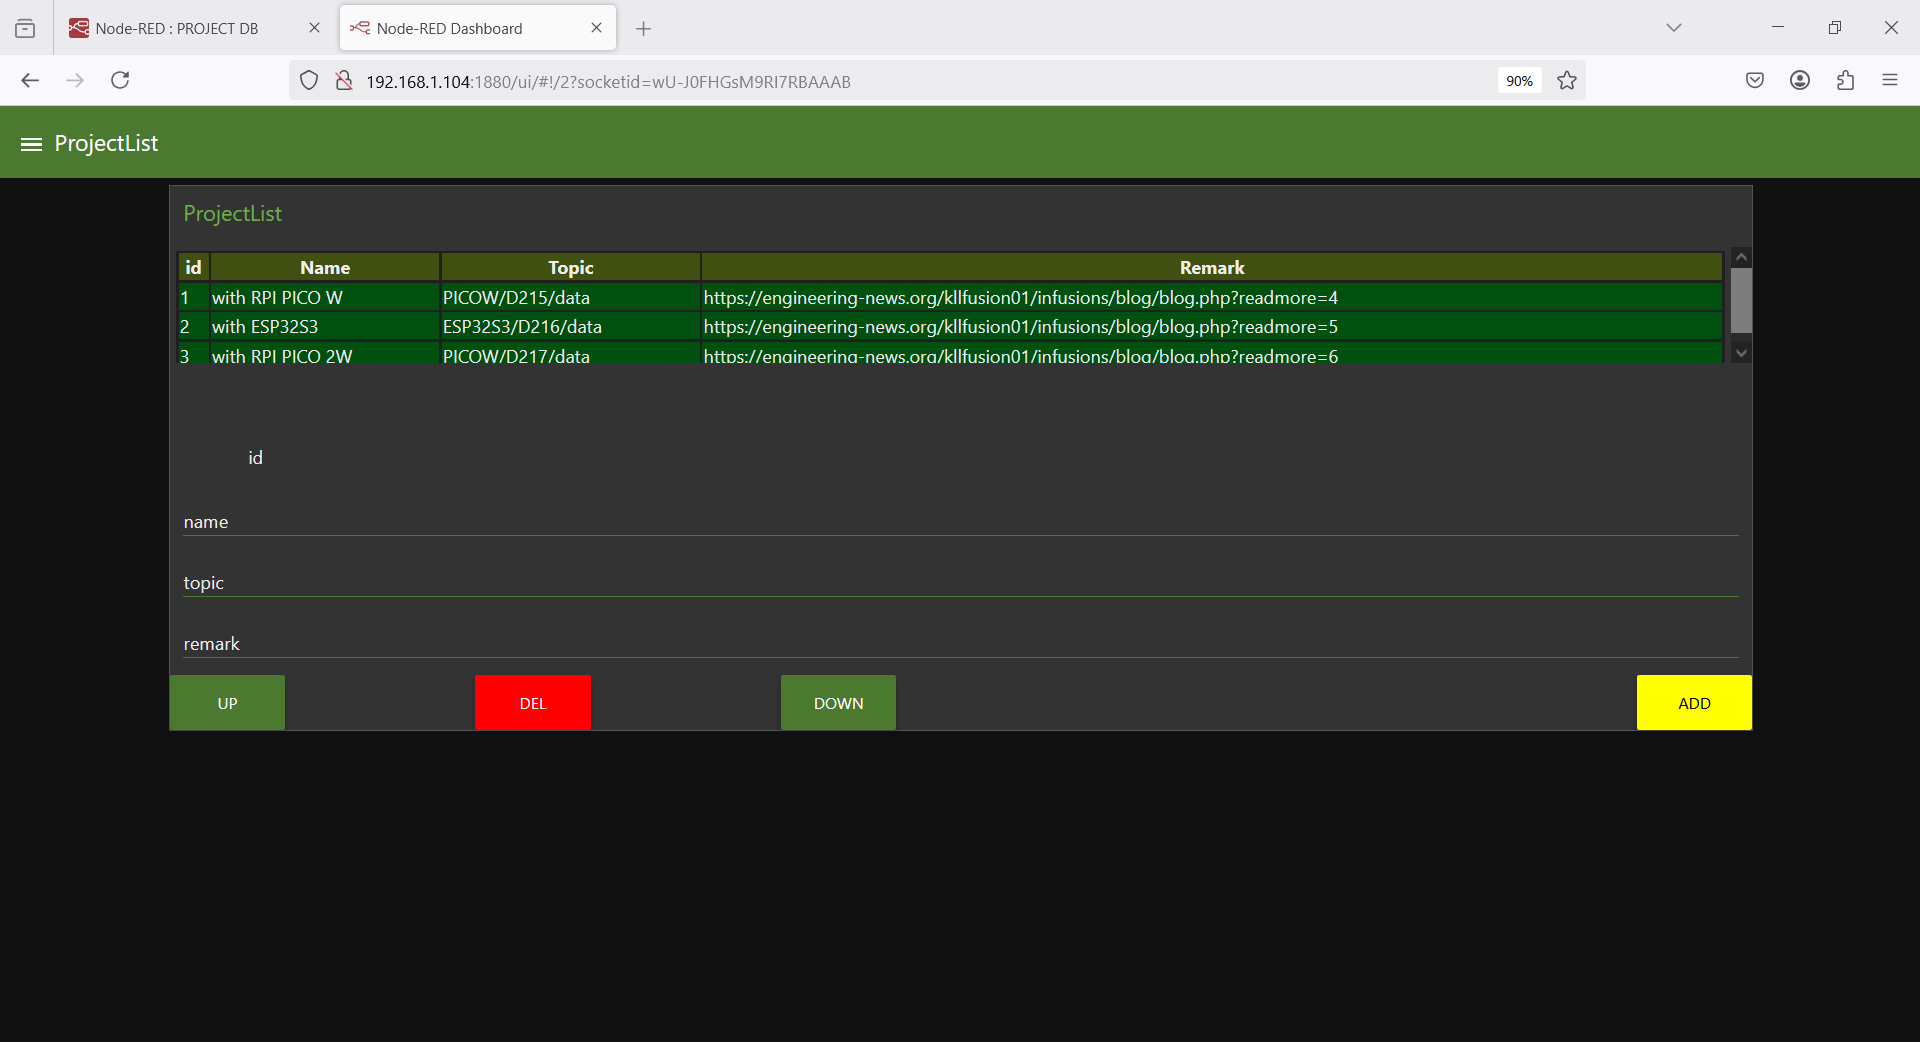
SQLITE tool
if you want to look into a db file
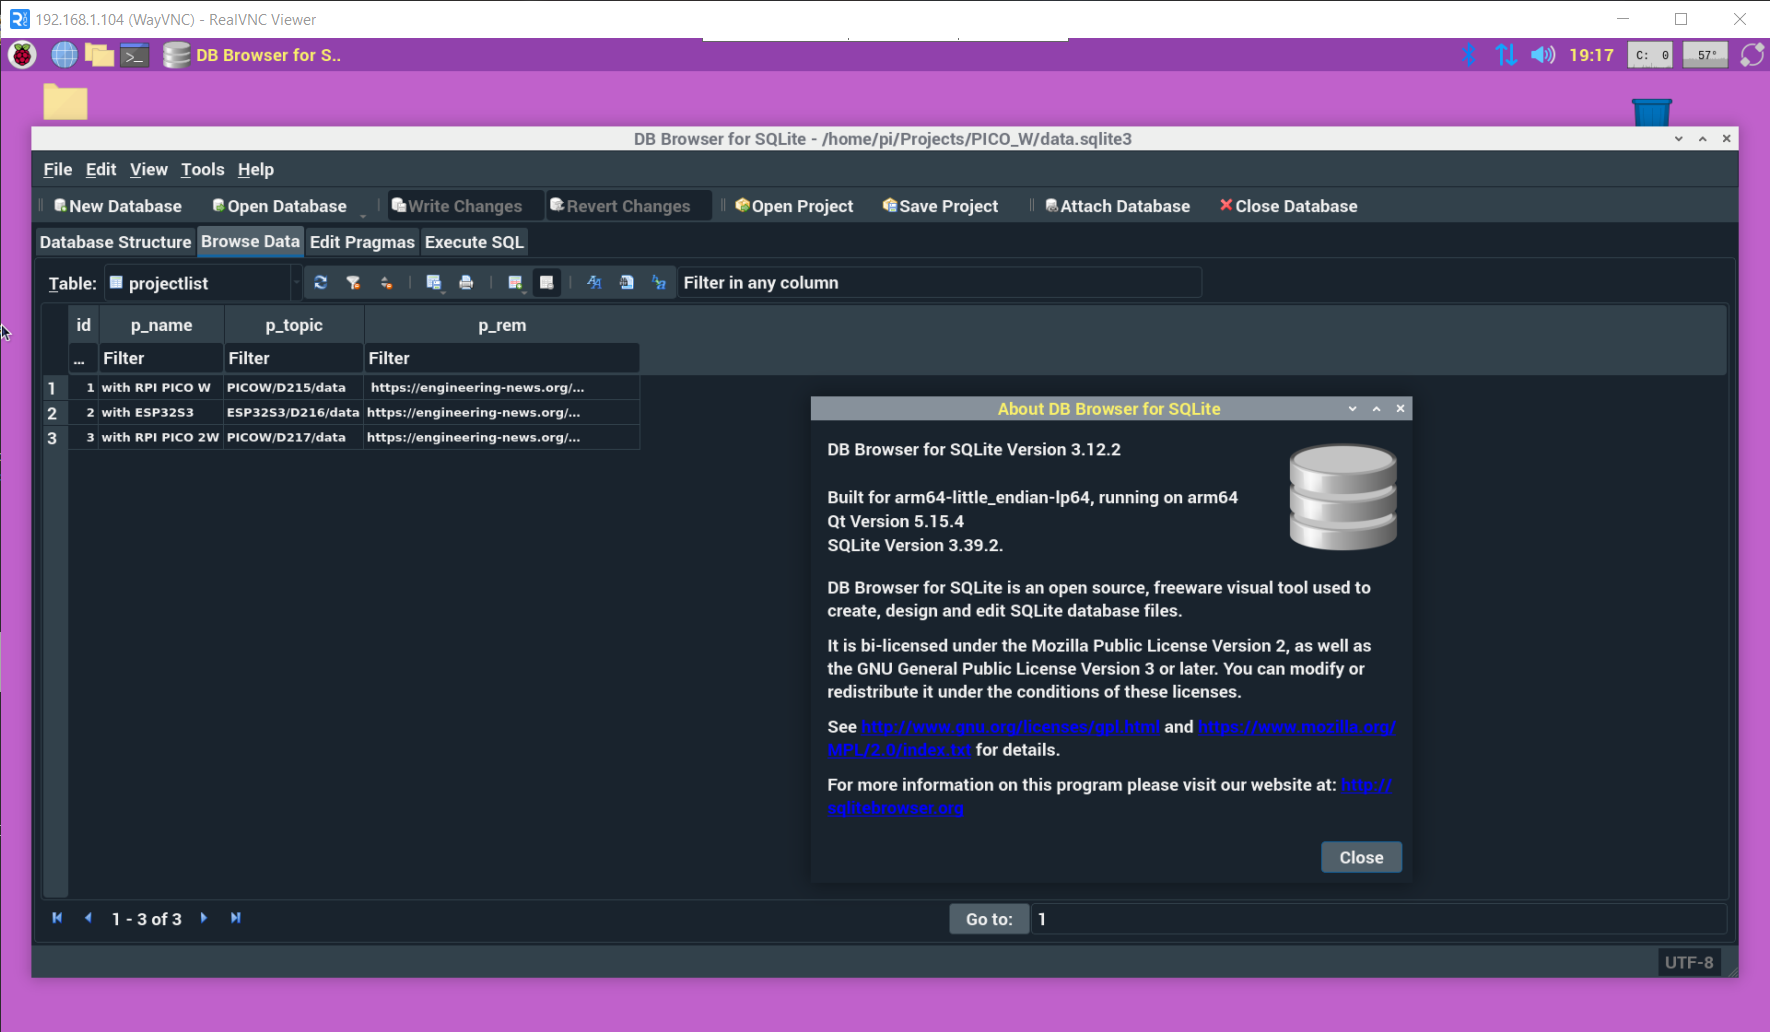
sudo apt install sqlitebrowser
where your historic data will be later.
Arduino IDE ( old version install )
in RPI4 open browser and do
https://downloads.arduino.cc/arduino-1.8.19-linuxaarch64.tar.xz?_gl=1*1v5vec3*_up*MQ..*_ga*MTA3MjU4ODUwMy4xNzQxMDY2NzU1*_ga_NEXN8H46L5*MTc0MTA2Njc1NC4xLjAuMTc0MTA2Njc1NC4wLjAuNDY3OTQ2MDk3
or on terminal use WGET ...
that i got from https://www.arduino.cc/en/software
the 1.8.19 linux arm 64 bit
cd Downloads
find arduino-1.8.19-linuxaarch64.tar
tar -xvf arduino-*.tar
cd arduino-1.8.19
sudo ./install.sh
find in menu / programming /
Arduino IDE
i have not done that for a long time,
actually work win 10 PC Arduino IDE 2
but it still makes sense:
-a- my RPIs are headless
-b- i work VNCviewer ( on windows / linux / android )
so when connect to USB of RPI,
can use THONNY or Arduino IDE to code
* Arduino
* ESP
* RPI PICO
boards in
* Arduino
* MicroPython
* CircuitPython ( use MU editor )
from everywhere inside LAN ( sorry, beach is too far away )
after setup ( and run ) you find path:
/home/pi/Arduino _____________// already with path /libraries in it
there you can copy your projects
but first make a
BACKUP
made a SD card copy ( to uSD 8GB / 317MB free only )
as RPI4 master / BACKUP
test it is running with mosquitto and node-red
now can start CONFIG work
that's the thing, with Arduino IDE not only program Arduinos
to allow use PICO W and ESP32...
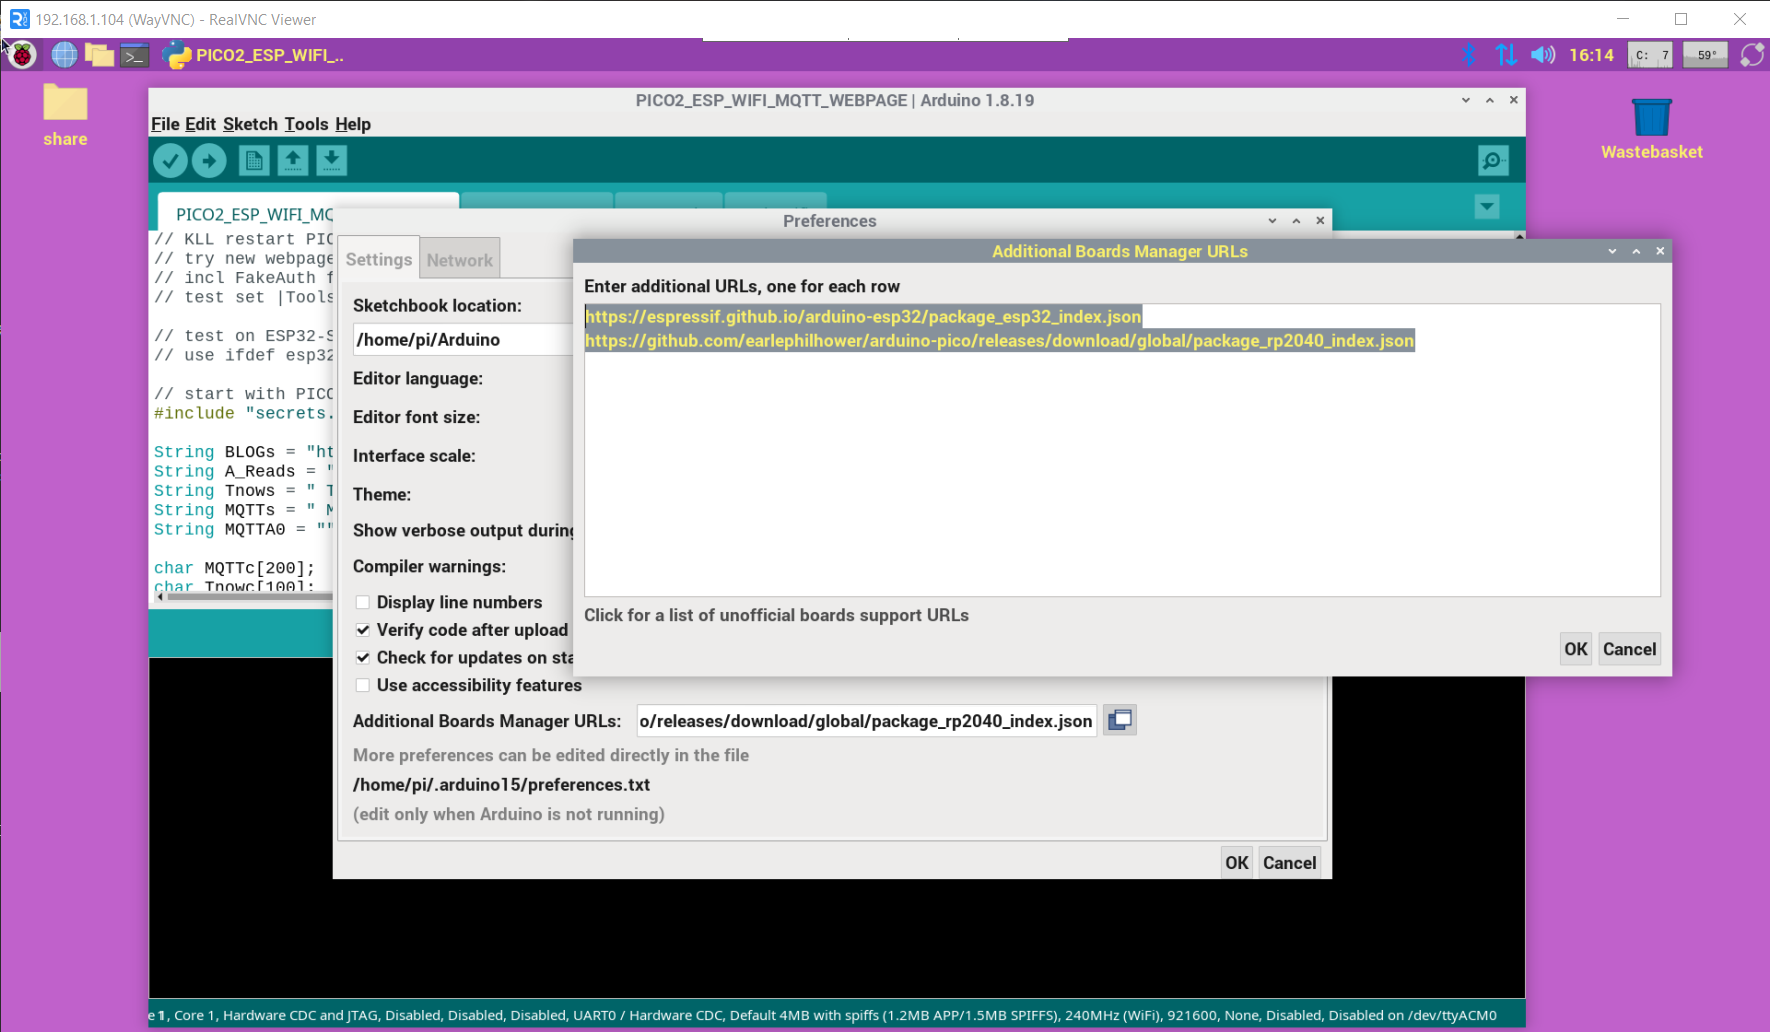
in File / Preferences / add board URL add 2 lines:
https://espressif.github.io/arduino-esp32/package_esp32_index.json
https://github.com/earlephilhower/arduino-pico/releases/download/global/package_rp2040_index.json
and in
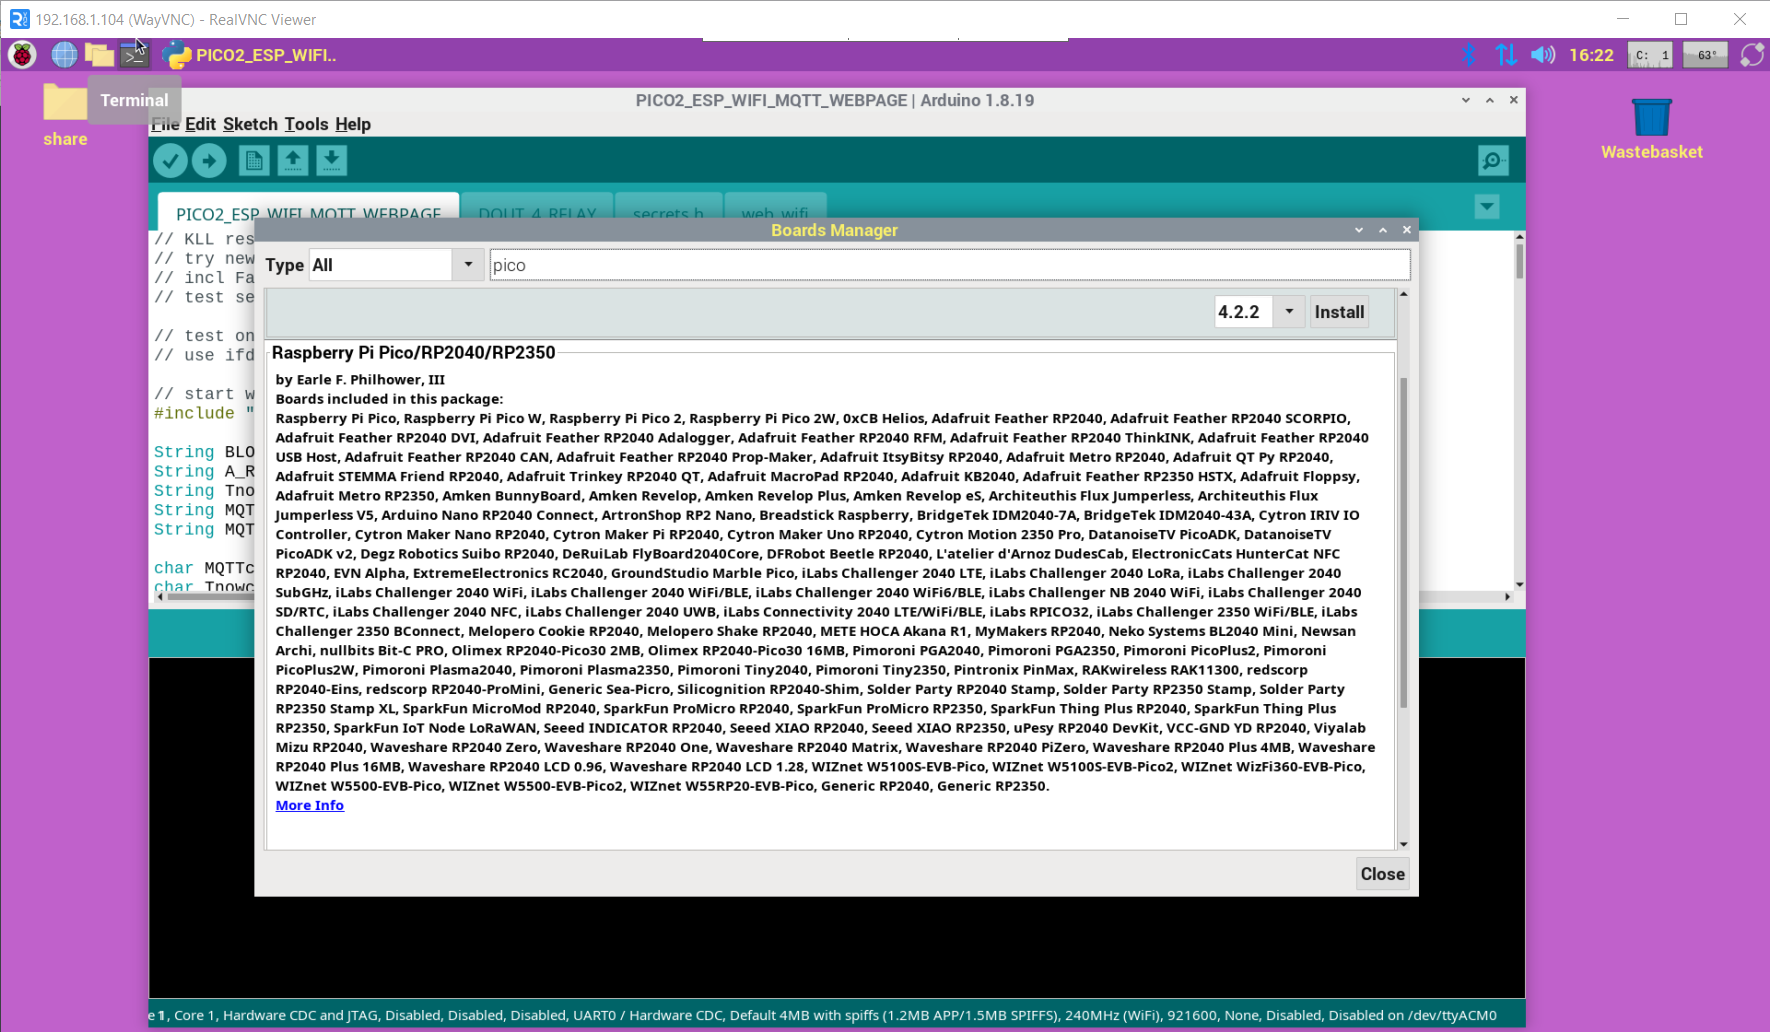
/tools/board/board Manager/
search esp or pico
and install like :
Raspberry Pi Pico/RP2040/RP2350 by Earle F. Philhower, III
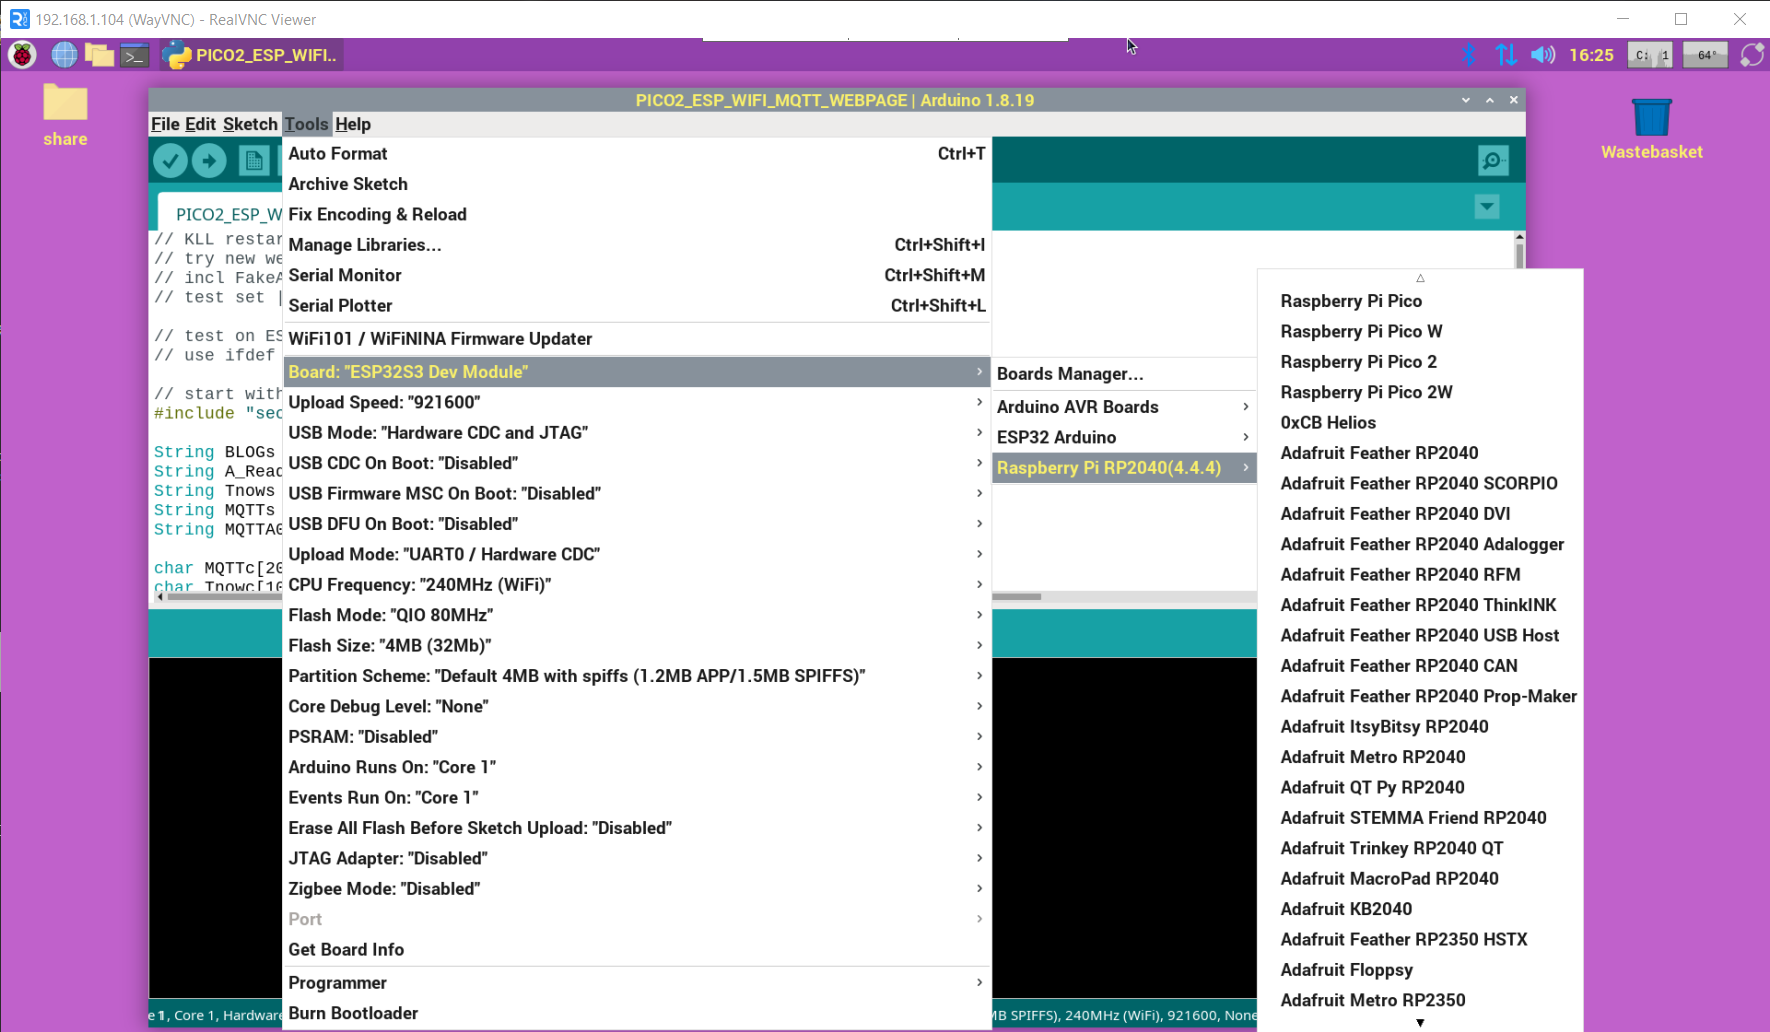
and then select a board in
/tools/board/
here as example start with ESP32S3 WEBSERVER MQTT ( a combined project works also for PICO W / PICO 2 W
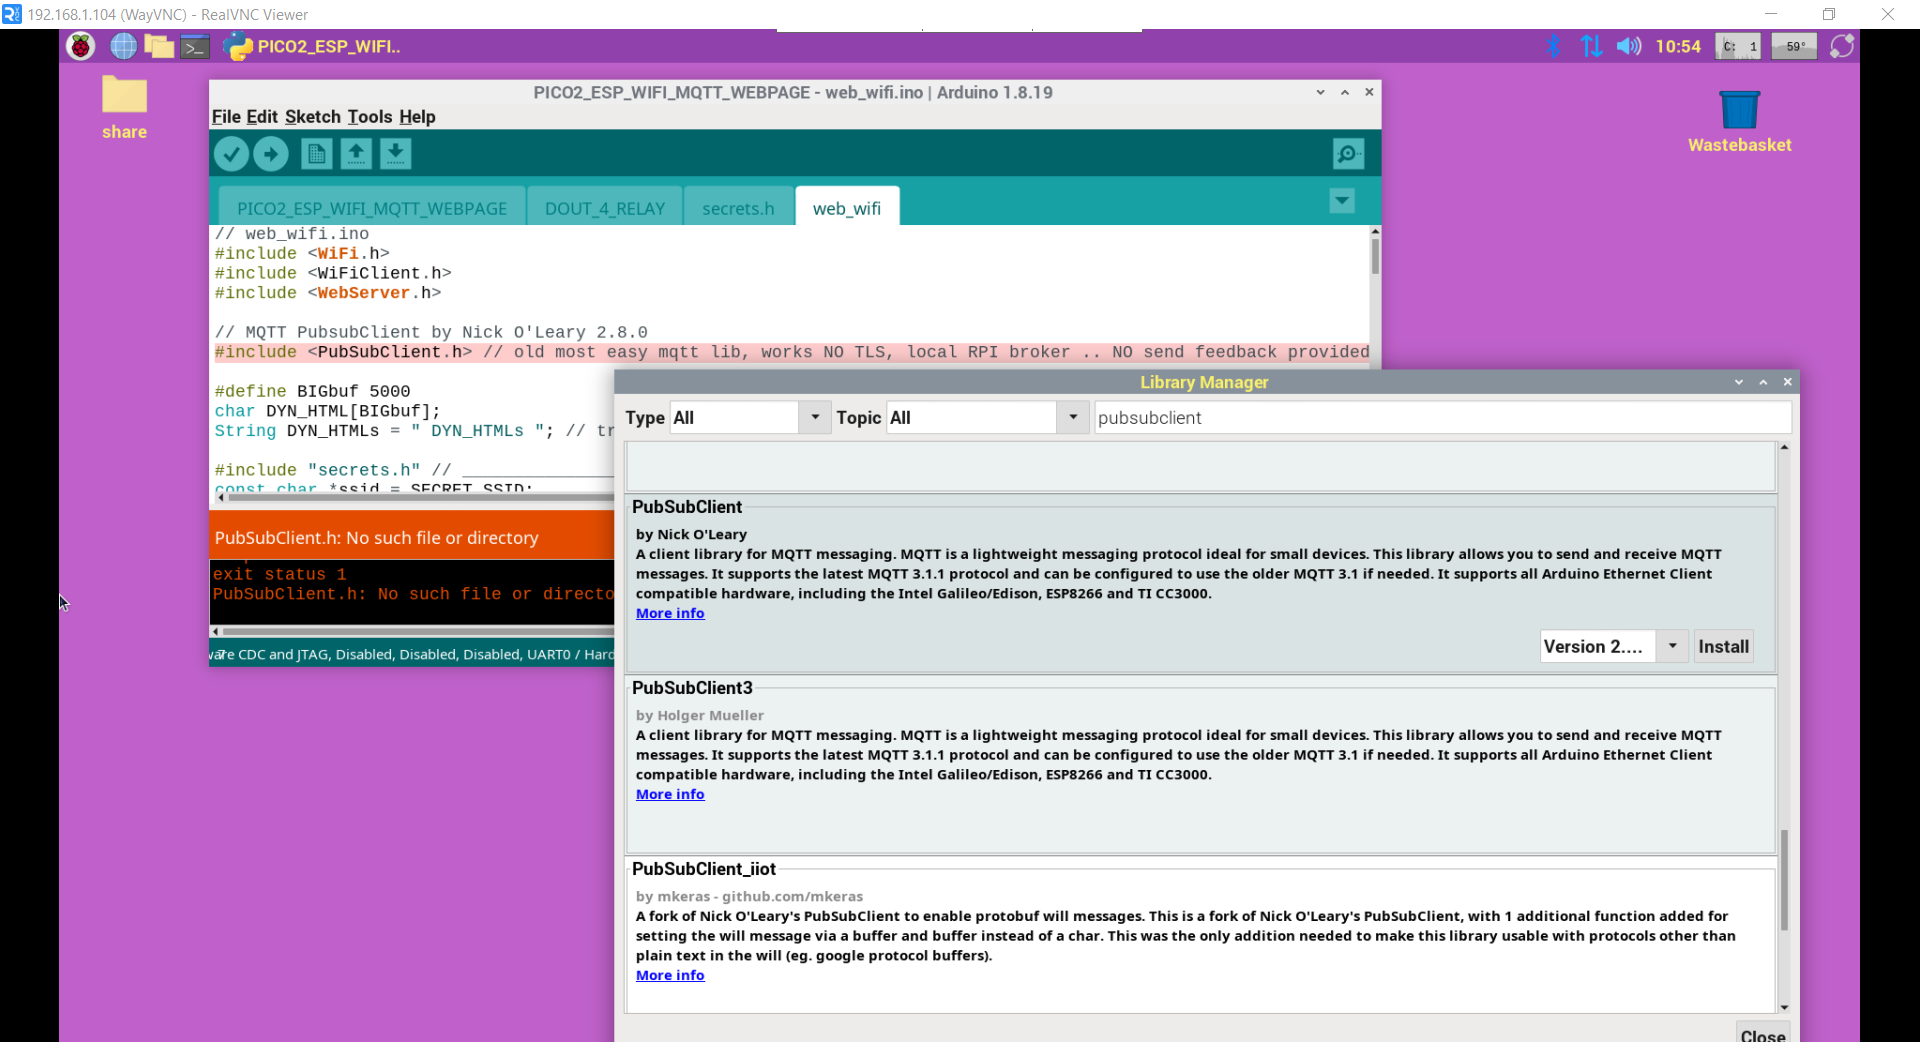
but first get ERROR about missing Library 'PubSubClient'
also must config your WIFI settings
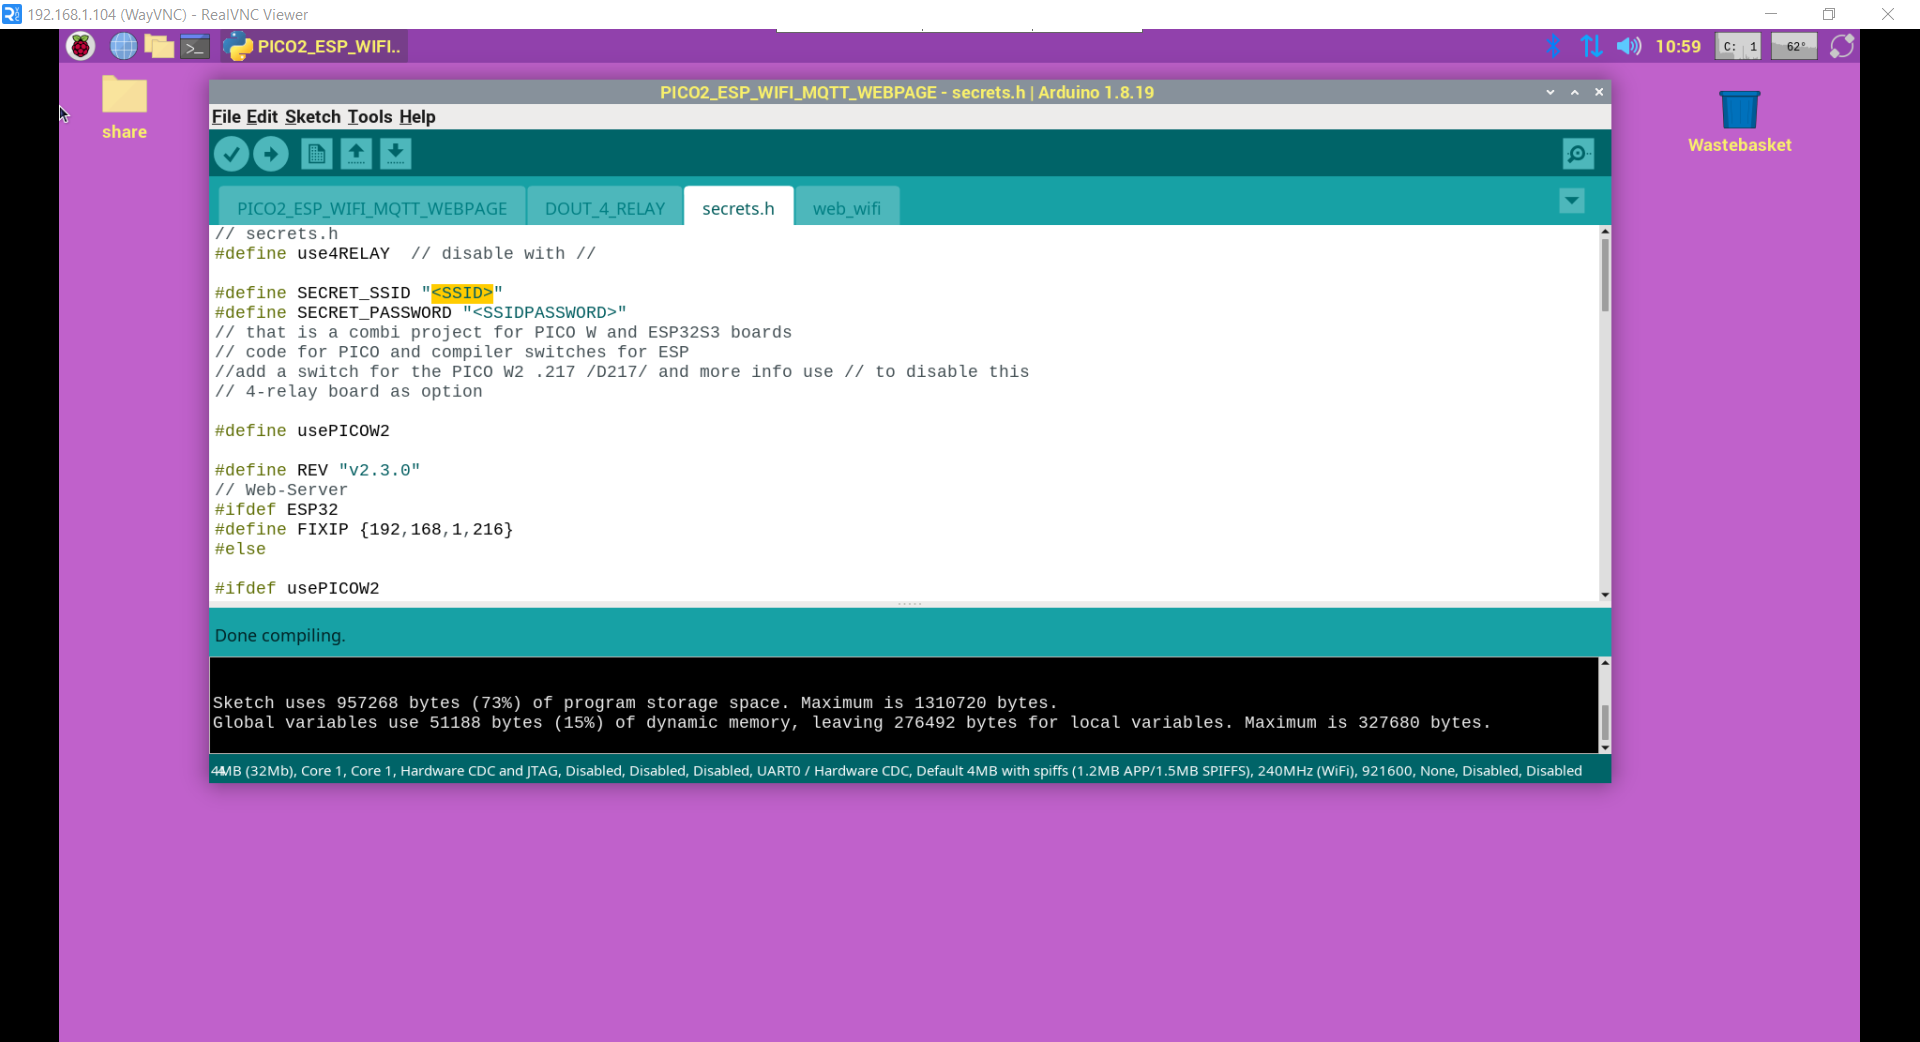
select the board ESP32S3 Dev
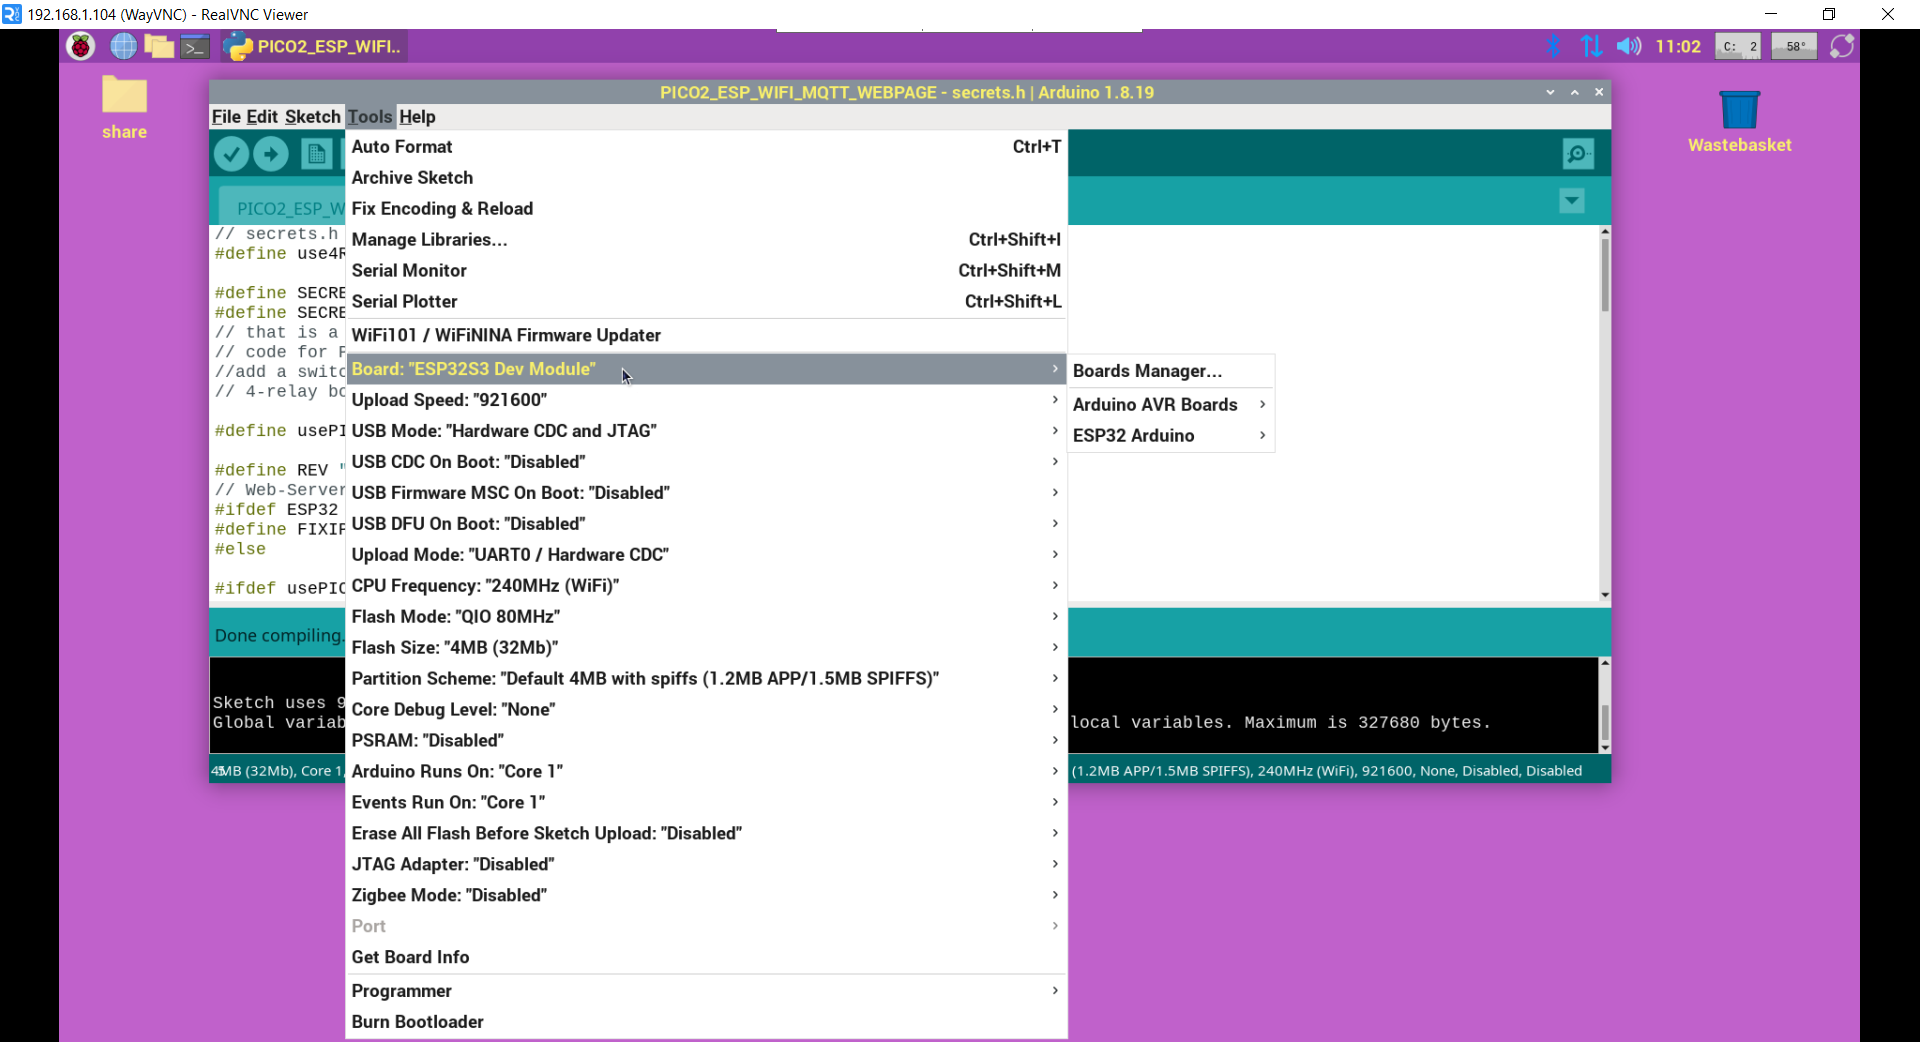
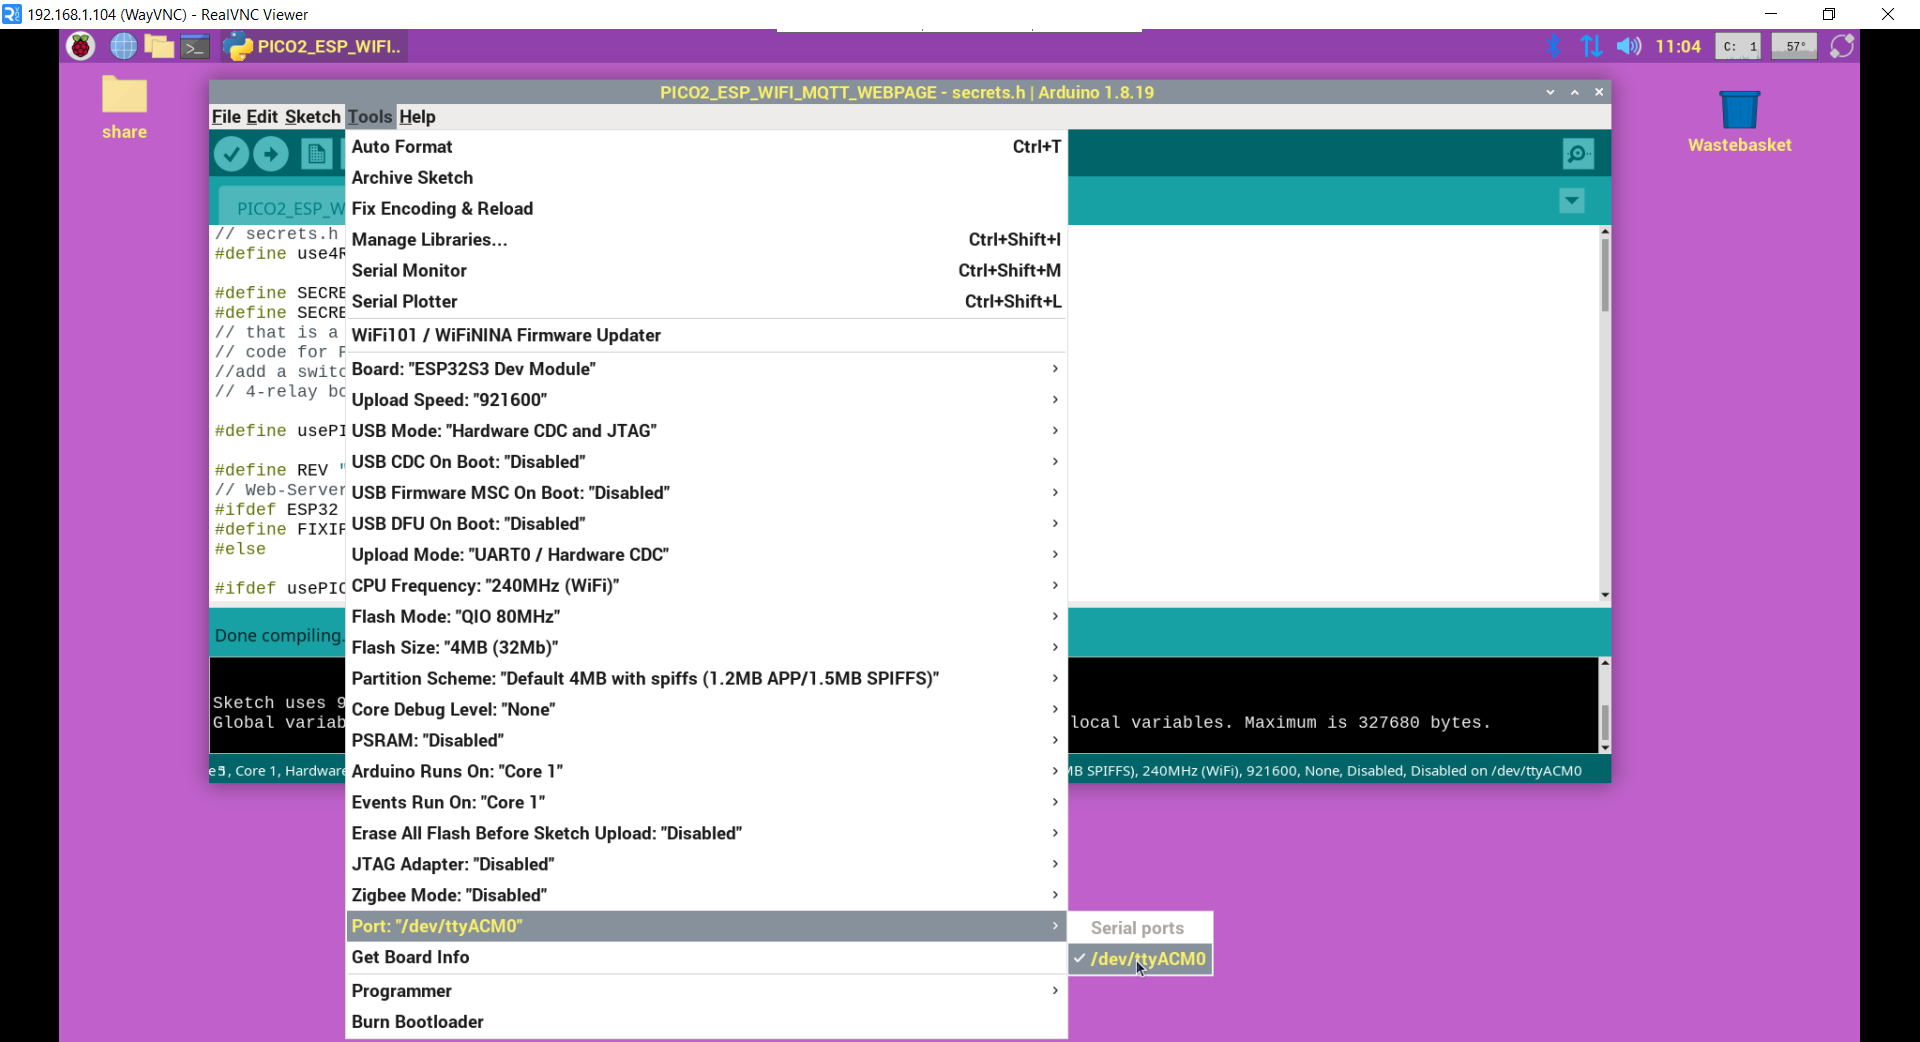
connect the board to RPI USB and select that port in /tools/ menu
press download ( what does SAVE / COMPILE / FLASH )
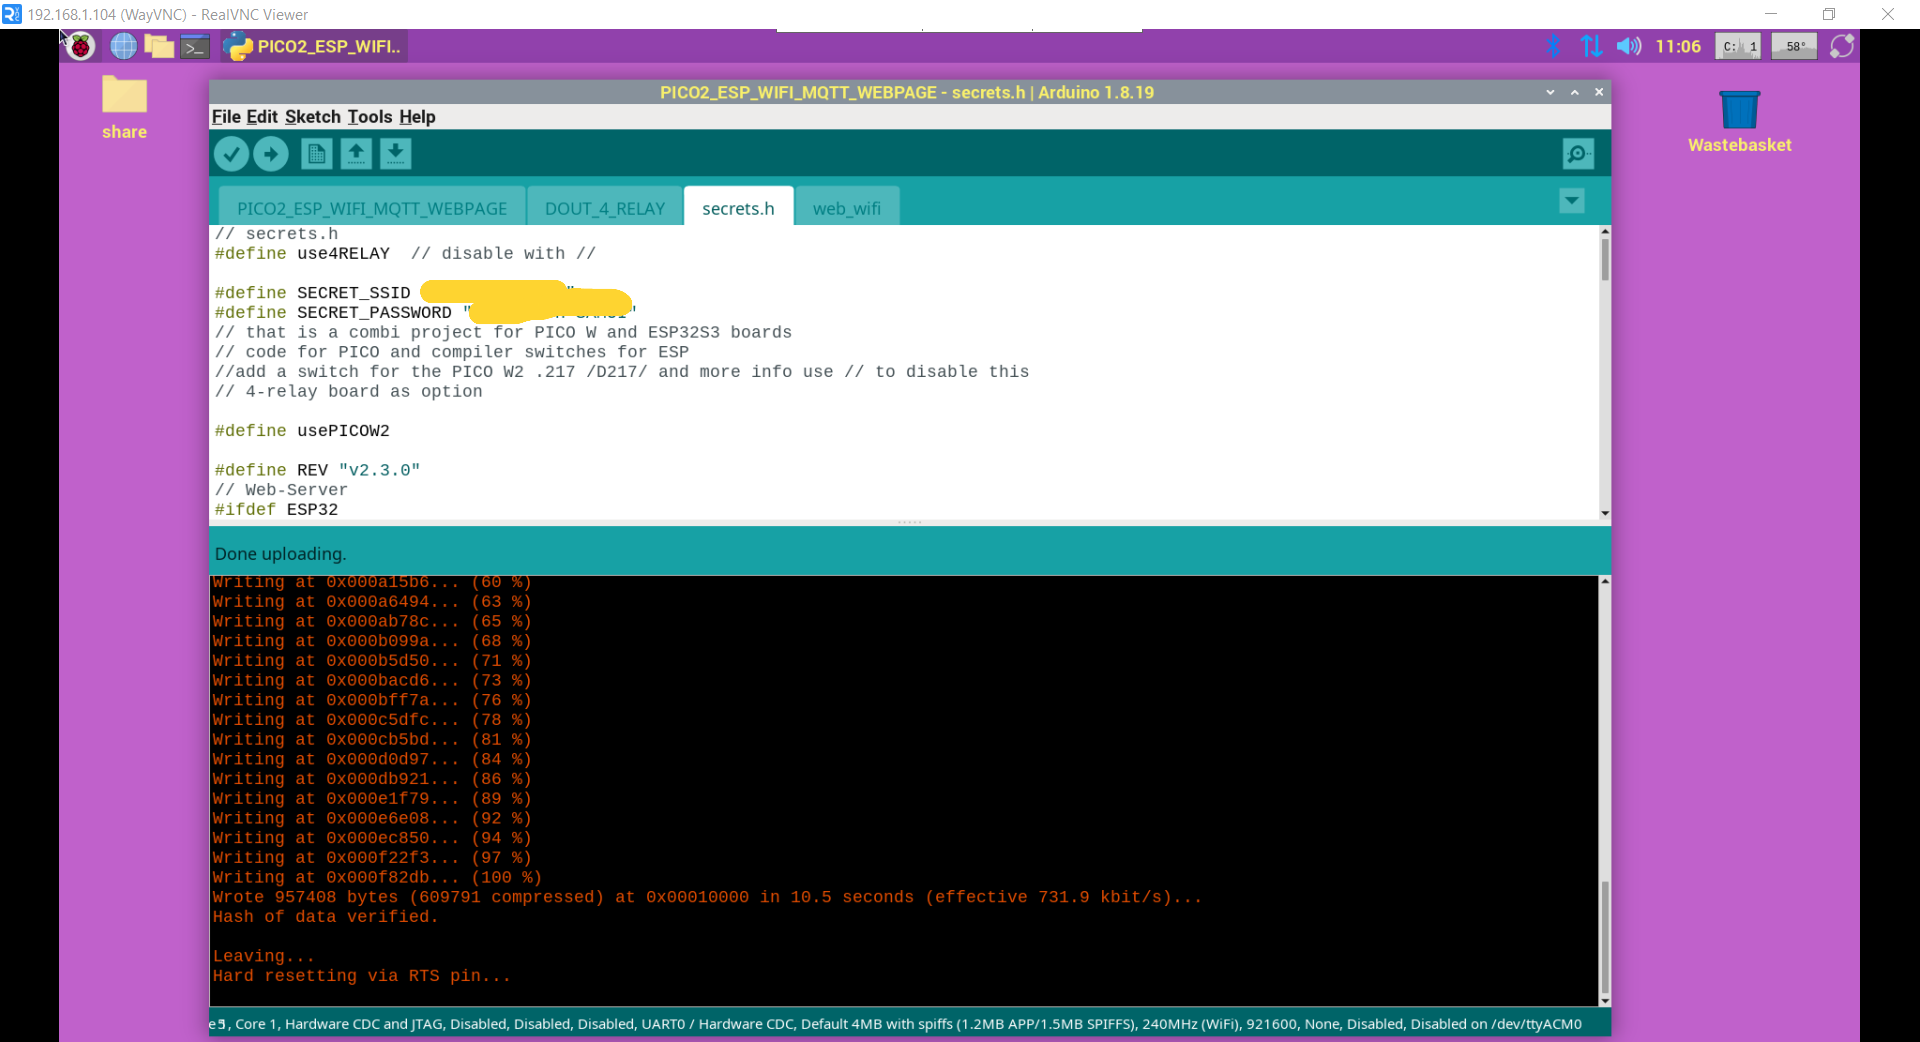
and check serial in-comming ( best press reset on board again to see the start / webpage ... )
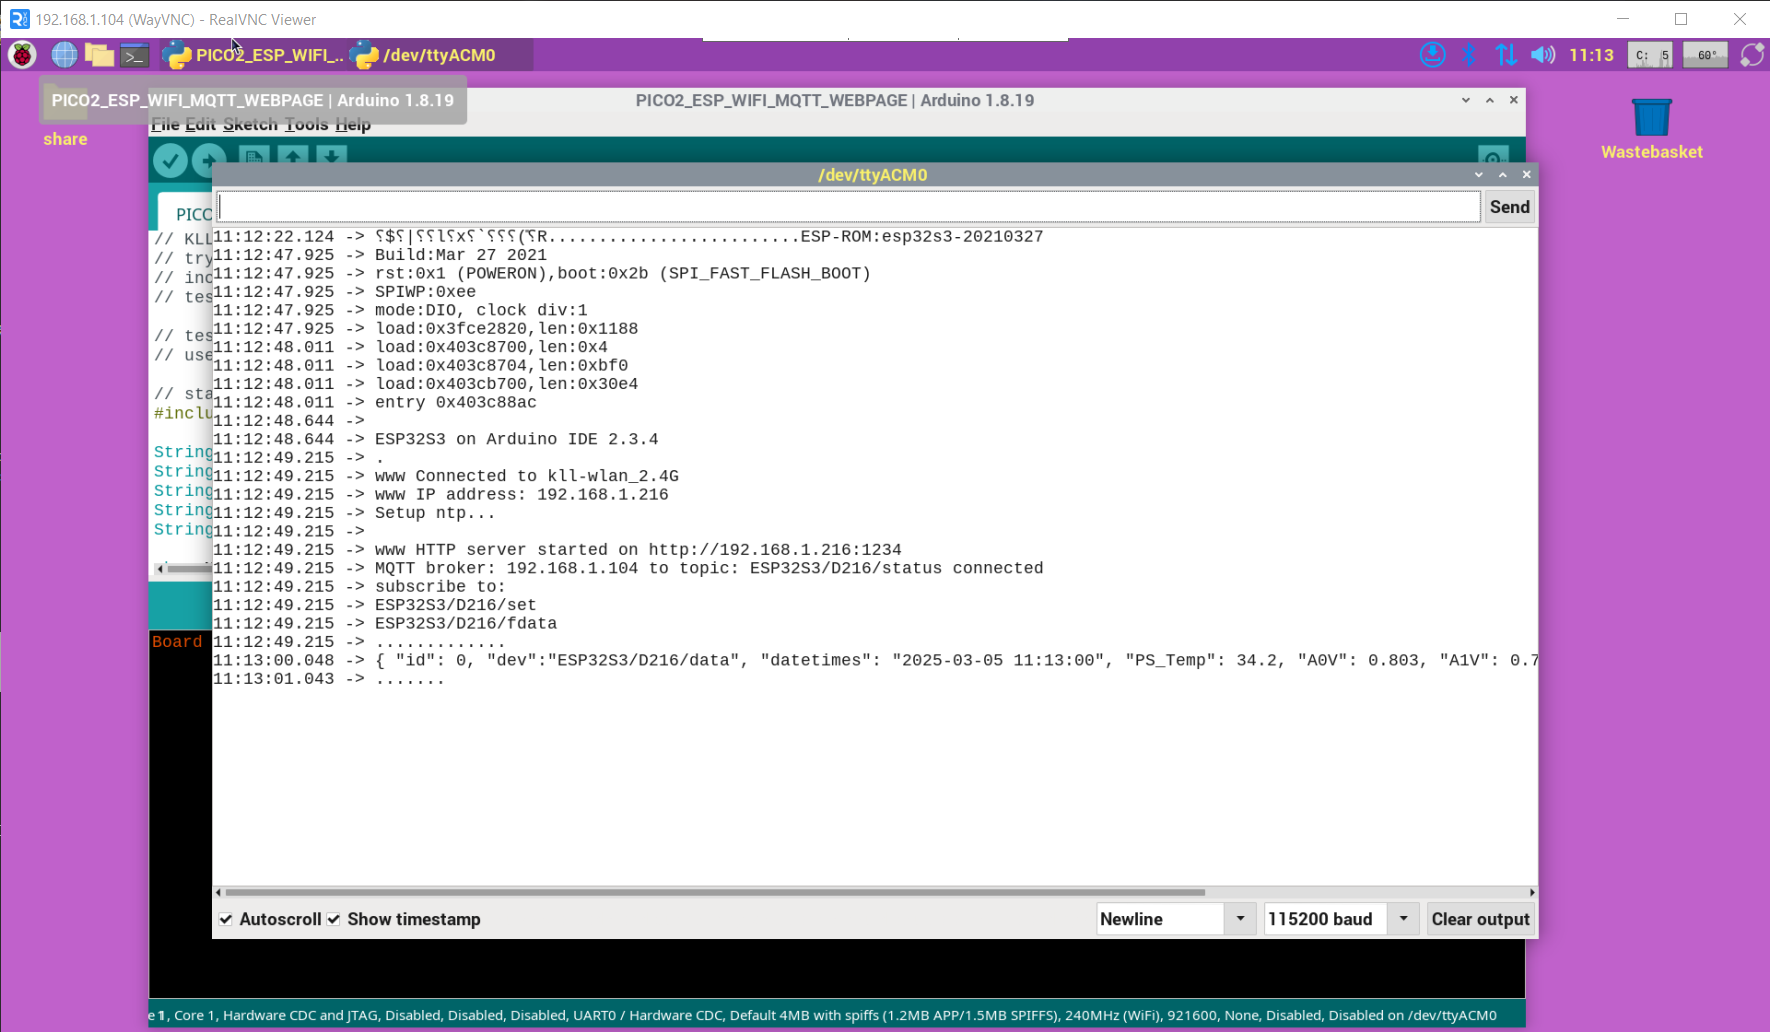
check also from any browser inside your LAN
http://192.168.1.216:1234
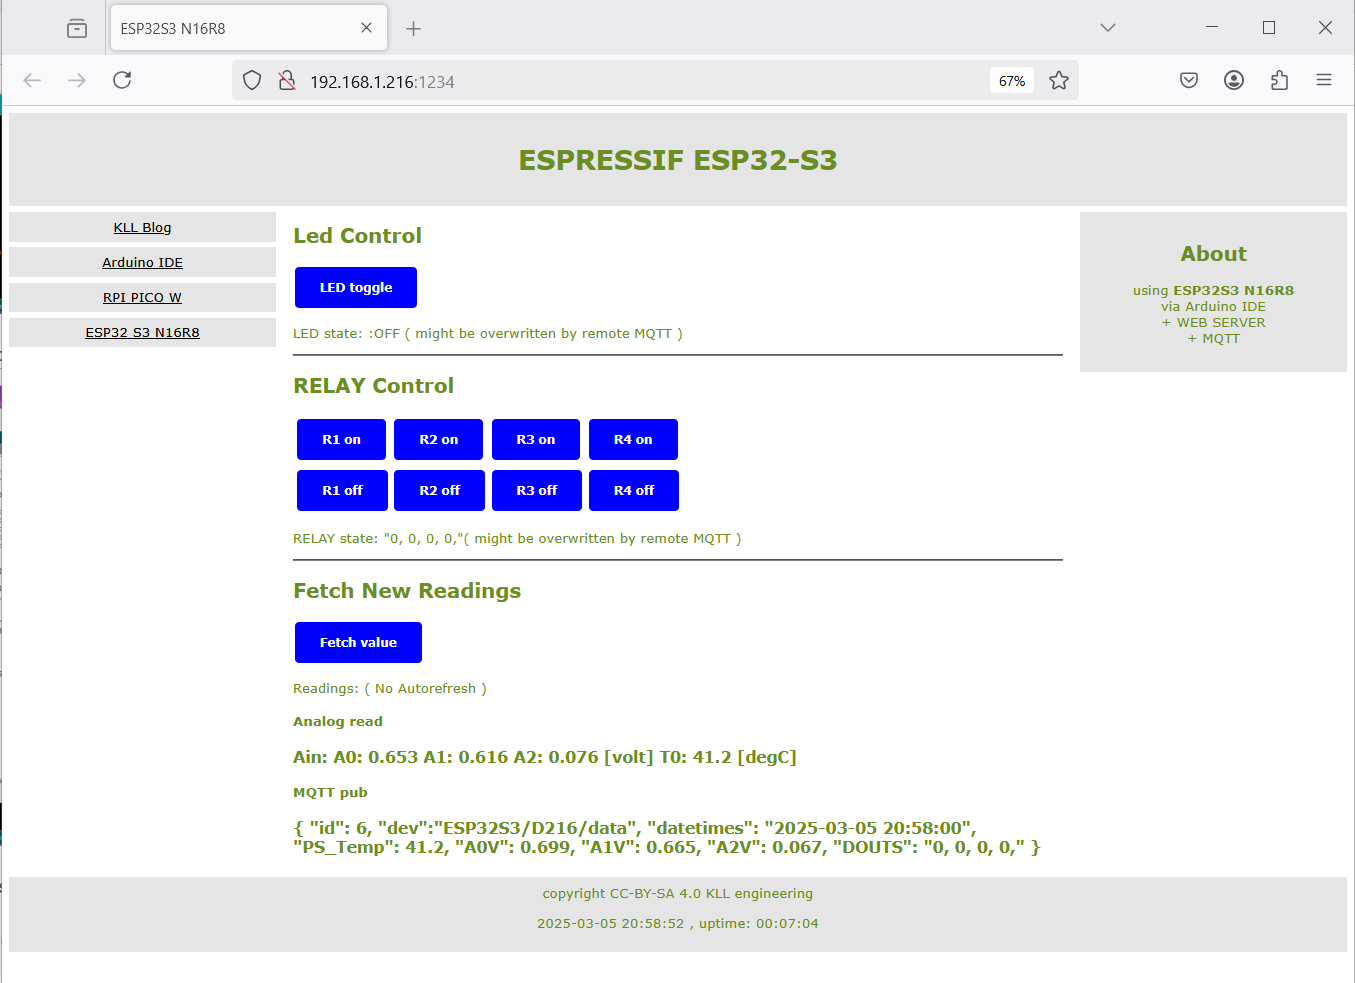
and MQTT explorer if data arrive
same in Node-Red.
test setup via DOCKER
UPDATE 1.5.2025
follow
VIDEO
TUTORIAL
but first SETUP in / for RPI4
burn 32GB samsung EVO uSD
reboot see [192.168.1.12]
+ + fixIP .104
+ + enable VNC
+ + update
+ + install MC ...
+ + copy .bash_aliases
IOTstack
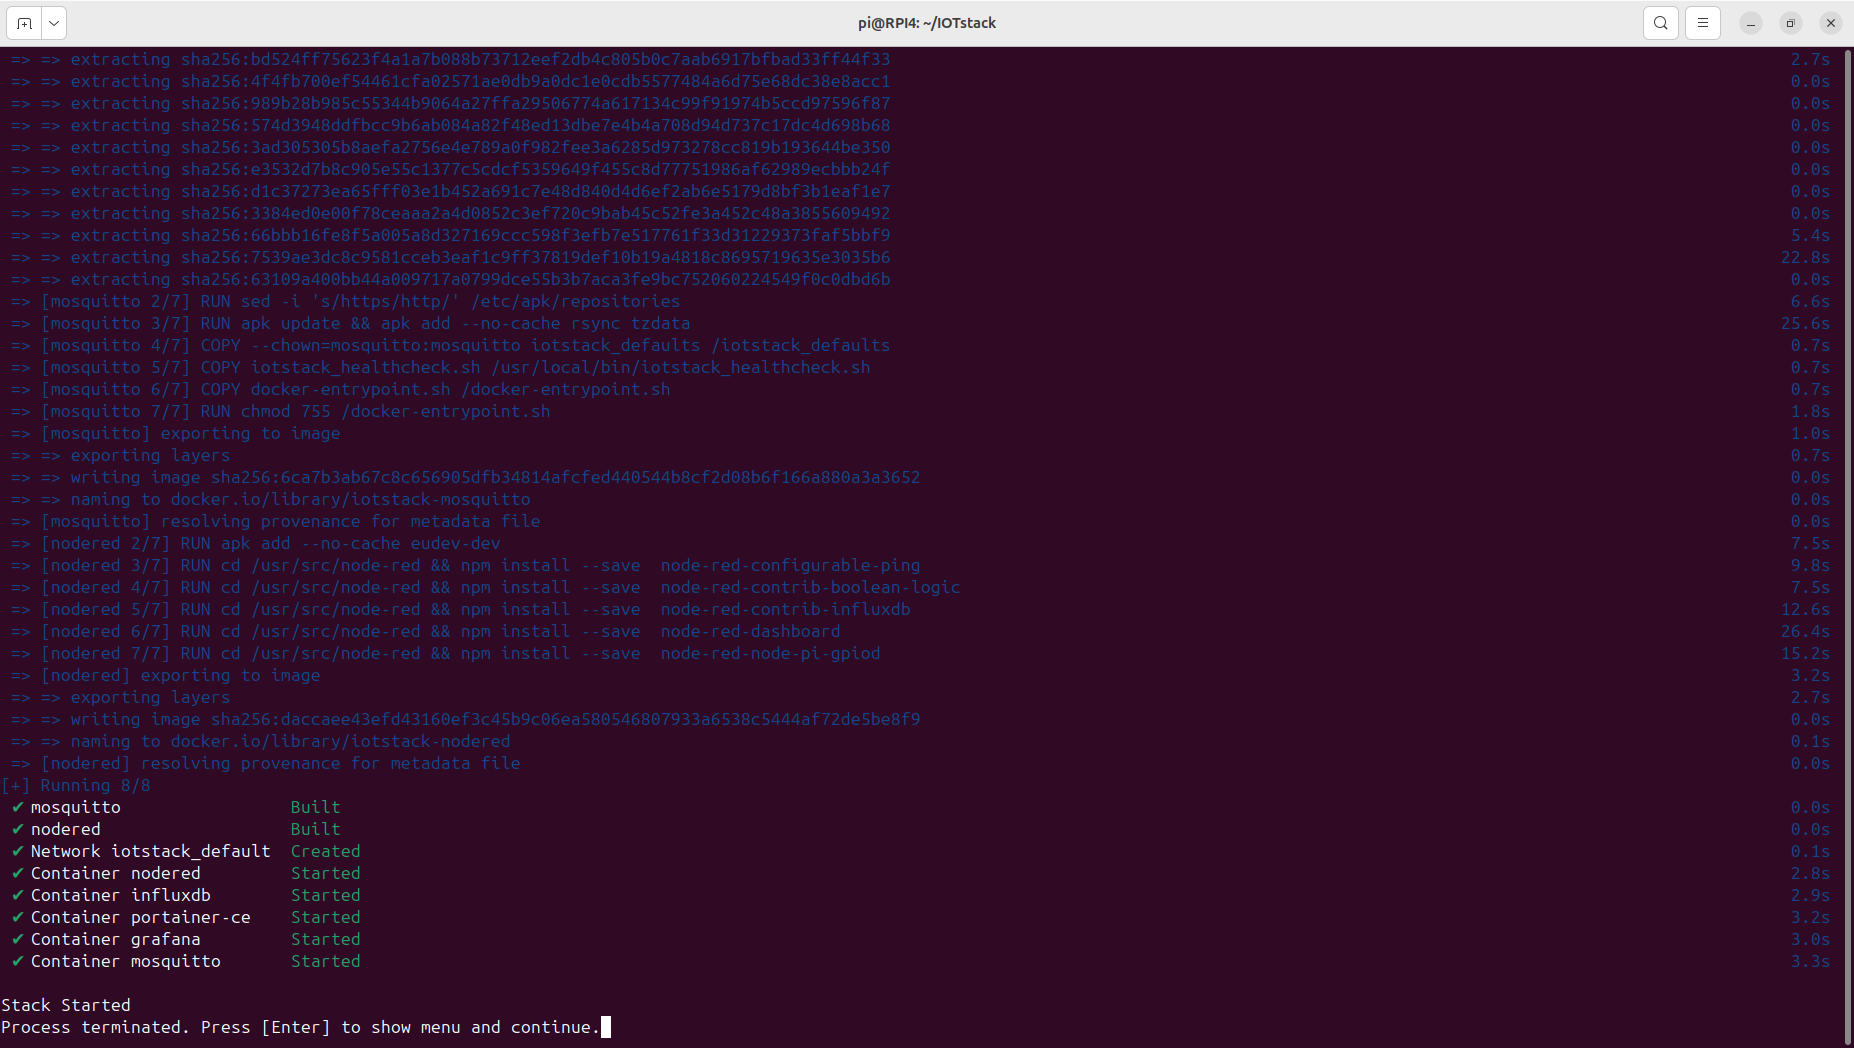
curl -fsSL https://raw.githubusercontent.com/SensorsIot/IOTstack/master/install.sh | bash
auto reboot
cd IOTstack/
./menu.sh
++ select
Grafana
InfluxDB
Mosquitto
Node-RED
Portainer-CE
now all that preparation actually results in ONE file used to setup the containers
docker-compose.yml
could just use that and
docker compose up -d
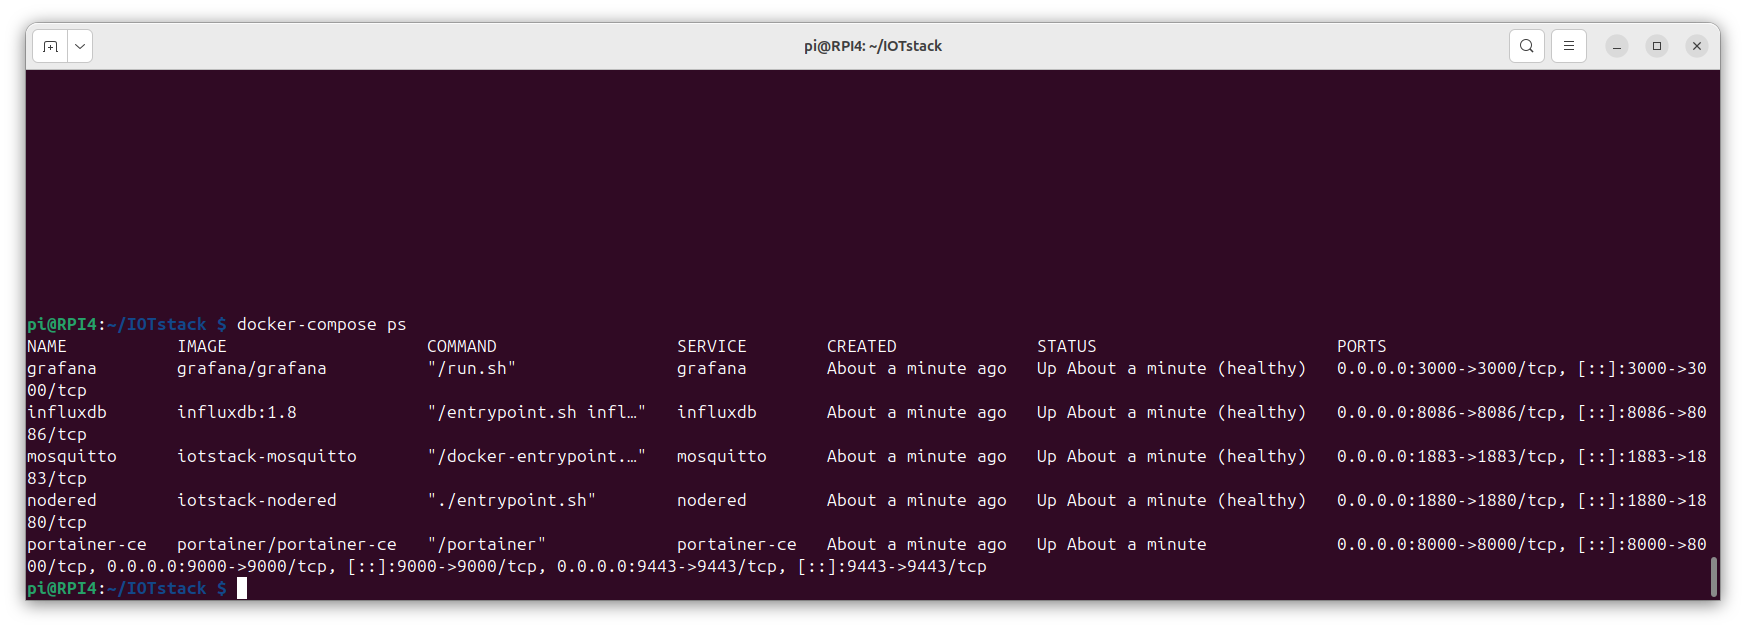
docker-compose ps
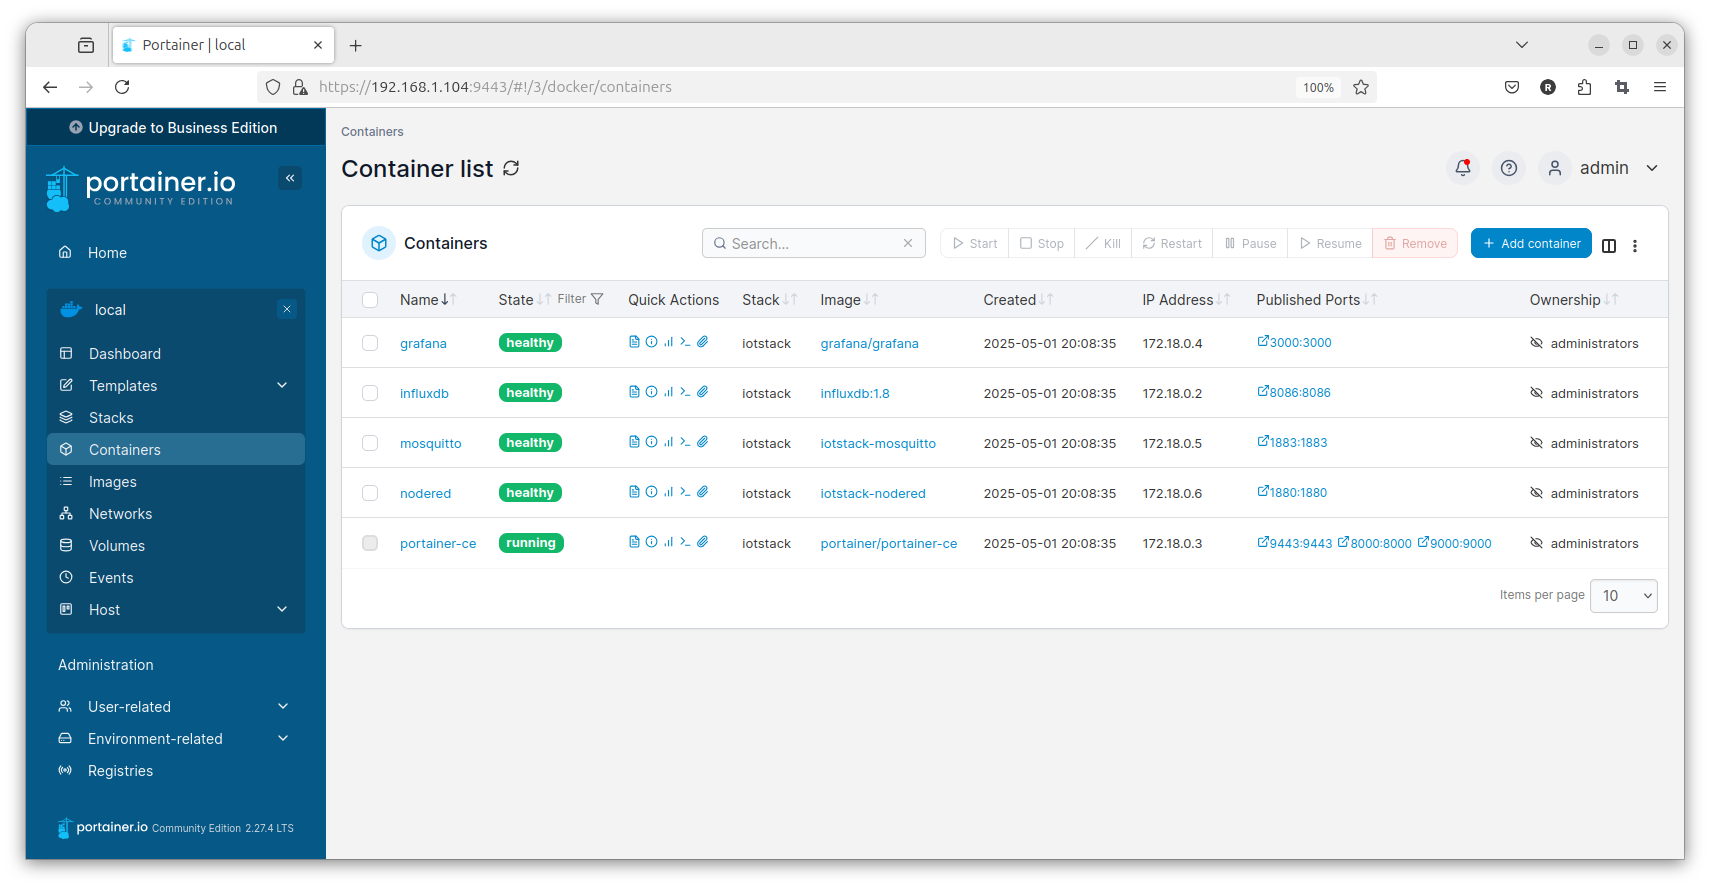
PORTAINER
https://192.168.1.104:9443
admin
new password
for database
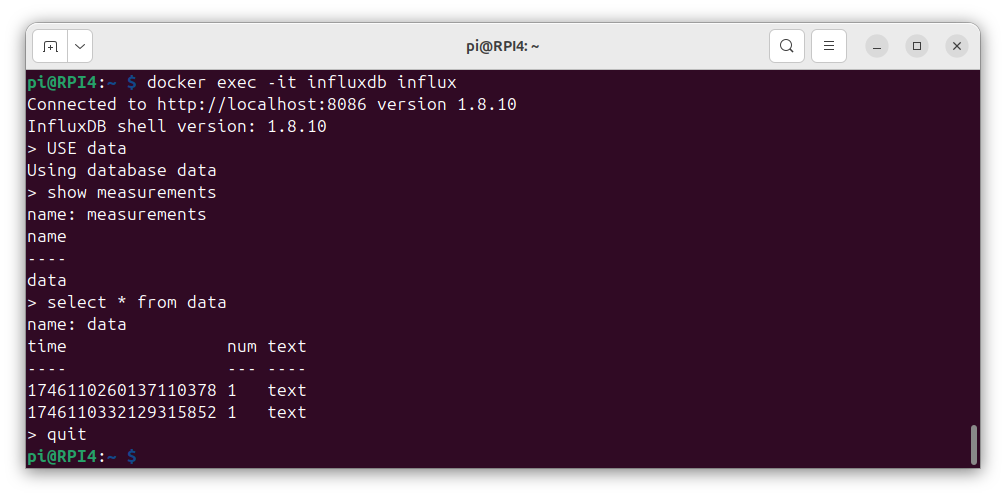
docker exec -it influxdb influx
CREATE DATABASE data //.sqlite3 //sensor_data
quit
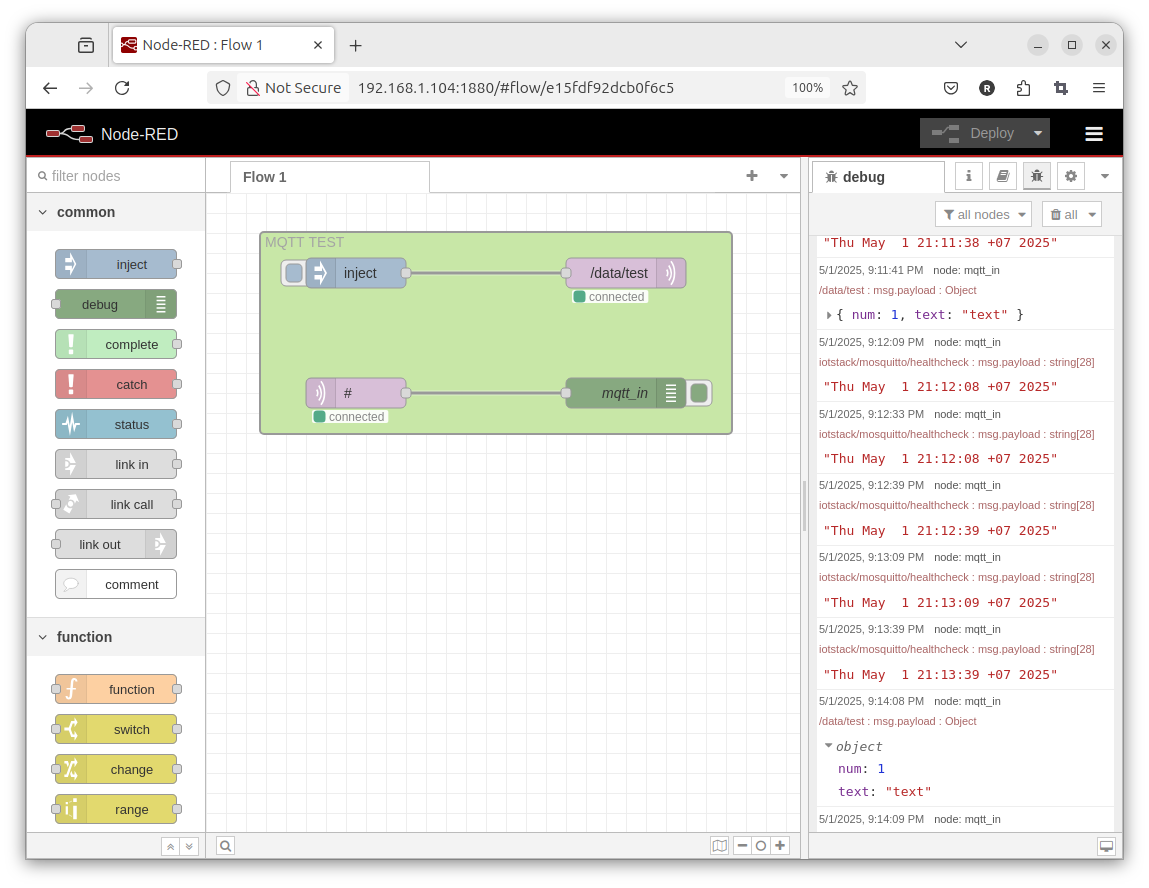
Node Red
http://192.168.1.104:1880
( not come with project ( or password ) option )
try mqtt_in mqtt_out ( not have password option )
use 'CHANGE' and 'influxdb out' to save to database 'data' table 'data' column 'num' and 'text'
GRAFANA
http://192.168.1.104:3000
( first login admin admin )
set new password:
admin
new password
data source
influxdb
HTTP URL
http://192.168.1.104:8086
Database 'data'
GET
2
[SAVE & TEST]
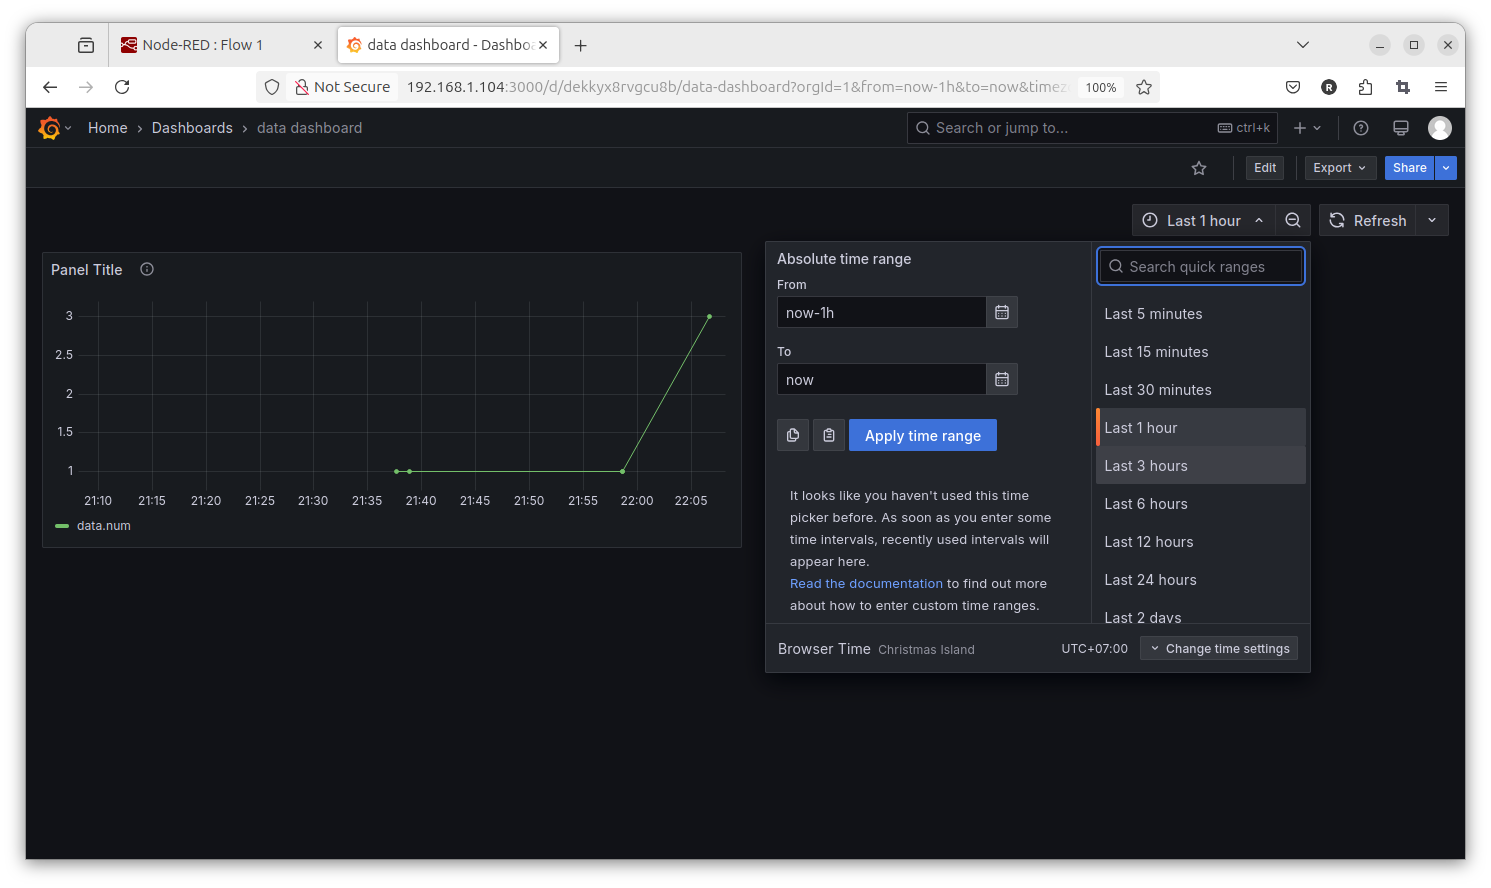
ADD dashboard NEW add panel
data num
name panel
name dashboard save
Summary:
+ + now have a ?professional? database instead SQLITE
+ + GRAFANA Trend menu i could never do in NR dashboard trend SQL... possibly just install additionally
- see problems:
- - MQTT (in docker ) setup without password // can do later?
- - Node-Red no Project / Password options setup
test OPEN CLOUD
opencloud
opencloud video
opencloud GIT
git clone https://github.com/opencloud-eu/opencloud.git
cd opencloud/deployments/examples/opencloud_full
docker compose up -d

on the linux PC!!
nano /etc/hosts
192.168.1.104 cloud.opencloud.test
192.168.1.104 collabora.opencloud.test
192.168.1.104 wopiserver.opencloud.test
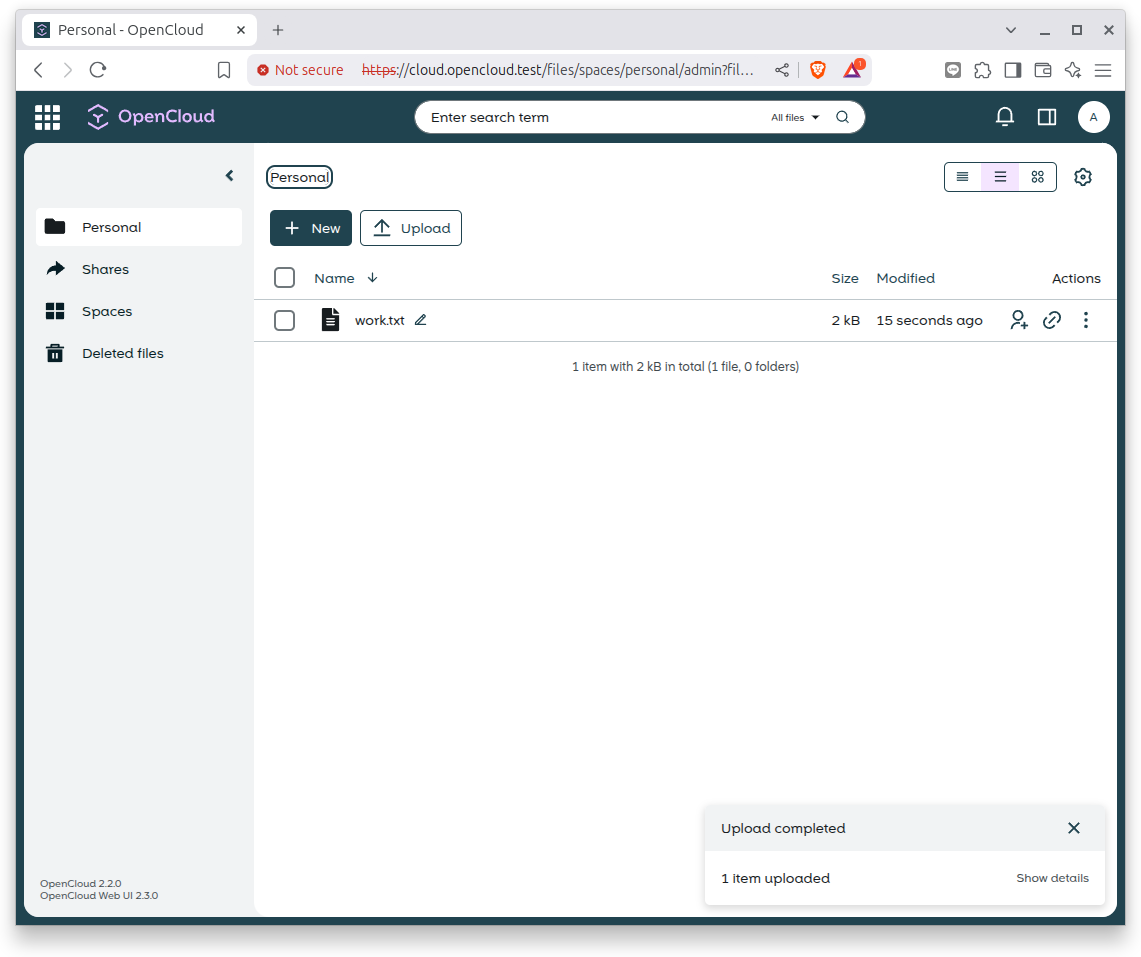
and use browser
cloud.opencloud.test
admin
admin
add GRAFANA old style
after that i try to install on the original RPI4
the GRAFANA manually
https://grafana.com/tutorials/install-grafana-on-raspberry-pi/
sudo mkdir -p /etc/apt/keyrings/
wget -q -O - https://apt.grafana.com/gpg.key | gpg --dearmor | sudo tee /etc/apt/keyrings/grafana.gpg > /dev/null
echo "deb [signed-by=/etc/apt/keyrings/grafana.gpg] https://apt.grafana.com stable main" | sudo tee /etc/apt/sources.list.d/grafana.list
sudo apt-get update
sudo apt-get install -y grafana
sudo /bin/systemctl enable grafana-server
sudo /bin/systemctl start grafana-server
192.168.1.104:3000
admin
admin
install SQLITE plugin
try link to our sqlite file
[/home/pi/Projects/PICO_W/data.sqlite3]
[file:]
[]
[] mode=ro&_ignore_check_constraints=1
[0]
but: permission error for sqlite plugin
Forum
In documentation for Sqlite plugin defined this trouble.
# edit (override) the grafana systemd configuration
systemctl edit grafana-server
add the following lines
[Service]
ProtectHome=false
reload the systemd config and restart the app
systemctl daemon-reload
systemctl restart grafana-server
sudo /bin/systemctl edit grafana-server
[Service]
ProtectHome=false
NOT WORK
now i try to move ( test copy ) to new dir /usr/local/data/ ( make owner 'pi' )
/usr/local/data/data.sqlite3
and it works